Salesforce Live Agent
Live Agent helps Visitors or Customers from the website to get real-time assistance from the Online Live Agent user. Customers or Visitors can initiate the chat sessions by simply clicking the button or link or invitation on a webpage. Now, Live Agent user can support end users faster through the chat. Chat can be routed to different Live Agent users based on their skill set.
Step 1: Enable Live Agent
1. From Setup, click Customize > Live Agent > Settings.
2. Select Enable Live Agent.

Live Agent API is auto generated and it is used to make a request to live agent server.
3. Click Save.
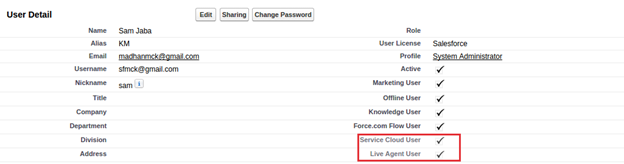
Step 2: Setting up Live Agent Users
Live Agent can be accessed only through Service Console application. So user must be enabled with Service Cloud User feature license and Live Agent user in User Detail page.
Step 3: Live Agent and Live Agent Supervisor Permissions:
We have to grant different permissions and tab visibility setting for Live Agent User and Live Agent Supervisor. Both Live Agent and Live Agent Supervisors must be enabled with API Enabled Administrative Permission in the user profile.
Step 3.1: Permission for Live Agent User:
Object Permissions: Give Read Permission to the following object for Live Agent Users.
- Live Agent Sessions
- Live Chat Transcripts
- Live Chat Visitors
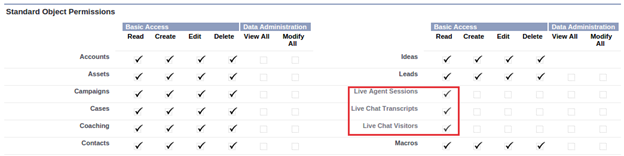
Tab Visibility Settings: Set Default On for Live Chat Transcripts and Live Chat Visitors tab.
Step 3.2: Permission for Live Agent Supervisor:
Object Permissions: Give Read, Create, Edit, and Delete Permissions to the following object for Live Agent Supervisors.
- Live Agent Sessions
- Live Chat Transcripts
- Live Chat Visitors
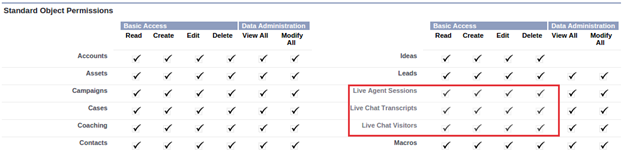
Tab Visibility Settings: Set Default On for Live Chat Transcripts, Live Chat Visitors, Live Chat Sessions and Live Agent Supervisor tabs.
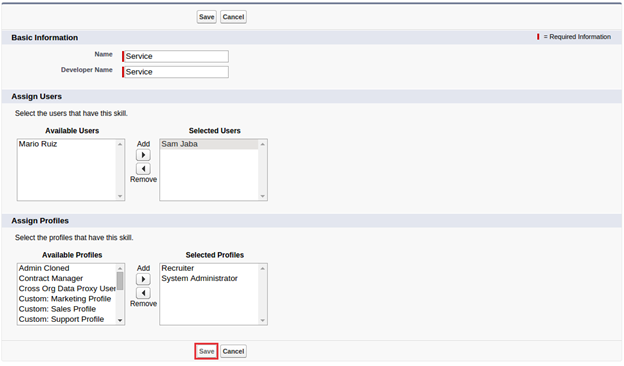
Step 4: Agent Skills:
Chat routing mechanism works based on the Live Agent User skills. Live Agent User can have more than one skill sets. Skills identify your agents’ areas of expertise.
To create skills for Live Agent User, Go to Customize > Live Agent > Skills
Enter Name of the skill and select Users and Profiles for the Skill. It is not mandatory to assign both Profile and Users for the skills. Either one of them is enough to assign the skill for the users.
Finally Click Save.
Step 5: Chat Buttons:
Chat button settings control the behavior of the chat buttons that customers use to interact with agents.
For creating Chat Buttons, Go to Setup > Customize > Live Agent > Chat Buttons > Click New
Create Chat Buttons or Automated Chat Invitation by choosing Type.
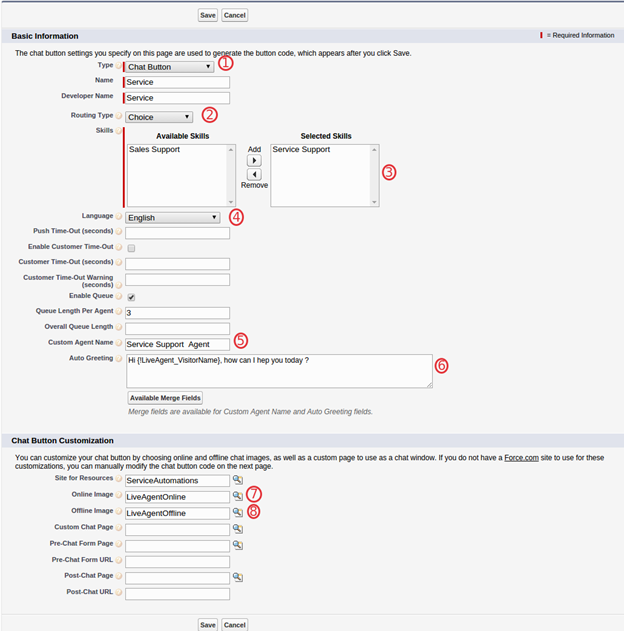
1. Choose Button type.
2. Routing type determines chat routing property
Choice: Chat are routed to any agent with the required skill.
Least Active: Chats are routed to the agent with the required skill who has the fewest active chats.
Most Active: Incoming chats are routed to the agent with the required skill and the greatest difference between chat capacity and active chat sessions.
3. Select a skill to associate with the button by moving it from the Available Skills list to the Selected Skills list.
4. Select Language for the text in the chat window.
5. Enter Custom Agent Name.
6. Enter Auto-Greeting Message.
7. Define Live Agent Online Image.
8. Define Live Agent Offline Image.
Note: For setting Agent Online and Offline Image, you must enable force.com site or you can place the custom Text or Image for Online and Offline content.
Open a notepad and Copy the auto generated chat button code.
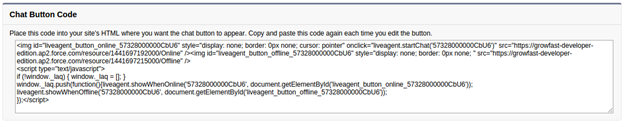
If force.com site is not enabled, then the Chat button code will like the below code and you can define your custom text or image in the highlighted area.

NOTE: Chat Button Custom Agent Name and Auto Greeting will override the Name and Greeting Message in the Live Agent Configuration Setup.
Step 6: Live Agent Configurations
We can set the functionality for Live Agent Users and Live Agent Supervisors in the Live Agent Configuration settings.
For Live Agent Configuration Setup Go to Setup > Customize > Live Agent > Live Agent Configurations > Click New.
Step 6.1: User Configuration Setting
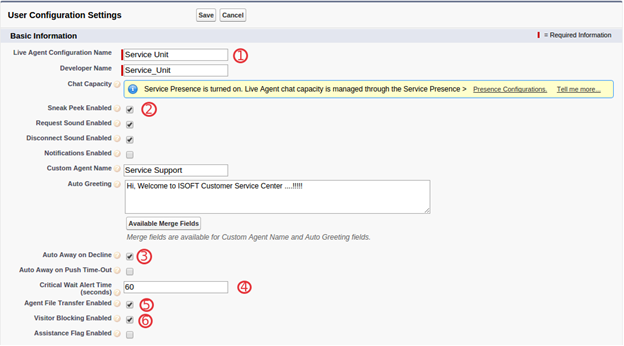
1. Name the configuration.
2. Allows agents view customer messages before they send them.
3. Live Agent Users status turned automatically to Away when they decline a chat.
4. Critical wait time alert is for alerting Live Agent User, if the Live Agent User is idle and not replying to Visitor.
5. Visitors can Transfer Files to Live Agent Users.
6. By enabling this option, Live Agent User can Block visitors.
7. Assign the Users and profiles that you want to add for the configuration.
Step 6.2: Supervisor Setting
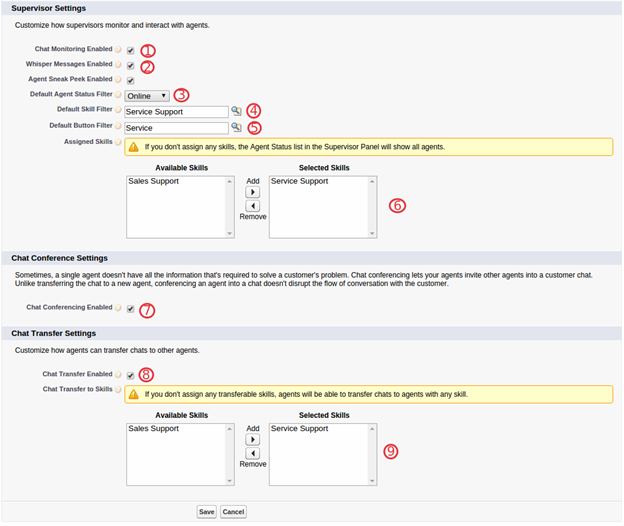
1. Allows Supervisor to monitor the chat between Live Agent User and Visitors.
2. This option allows Supervisor to send private message to Live Agent User during chat.
3. It allows the Supervisors to monitor the Live Agent User who is presently with that status.
4. Supervisors sees the option filter by default.
5. Supervisors sees the button filter by default.
6. Choose the skills.
7. It allows multiple Live Agent User to chat with Visitors.
8. Live Agent can transfer the chat to another live agent.
9. Select the skills.
Step 7: Chat Deployment
Live Agent deployment settings control the functionality that’s available to agents and their supervisors while agents chat with customers.
Open a notepad and Copy the auto generated Deployment code.

NOTE: Merge both Deployment and Chat Button auto generated code and save it as html code or place the code in your existing Web Page.
Step 7: Include Live Agent in Console Application
Go to Create > Apps > Edit the console app that you want to include Live Agent.
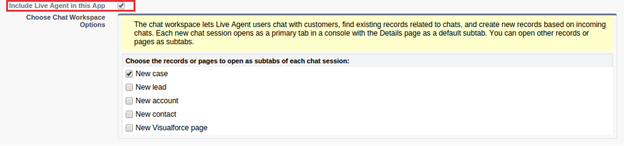
We can define the tabs to open when Live Agent User accept the chat.
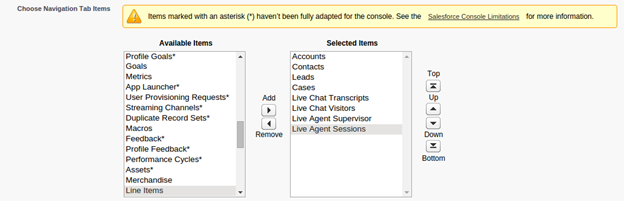
Step 7.1: Include Live Agent Related Tabs in Console App:
Choose the tabs that you want to display in the Console App. We can select all the tabs related to Live Agent in Console App. Live Agent User doesn’t see the Live Agent Supervisor and Live Agent Sessions tabs because of the tab visibility settings that we had set before.
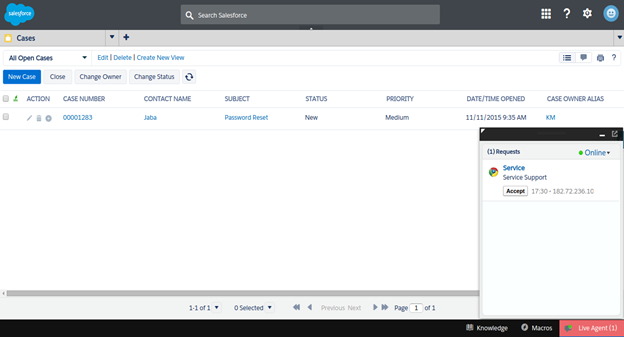
Step 8: Handling Visitor Chat in Console:
By default, the offline image will be displayed on the webpage, if the Live Agent User is not in the Online. Once the Live Agent User is Online, then the online image that we defined earlier will be displayed. Visitors need to click the button to initiate the chat with Live Agent User.
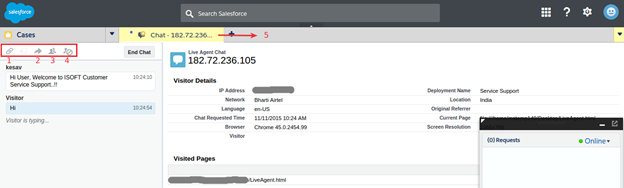
After accepting the chat, Live Agent User can do the following:
- User can associate the chat with the existing Contact, Account, Lead, or Case.
- Chat can be transferred to another Live Agent User. This option is disabled, if no Live Agent Users are available.
- Using Chat conferencing, Live Agent User can invite another Live Agent User for the chat with Visitors. Multiple Live Agent User can assist Visitor in a single chat window.
- Live Agent User can block the Visitors.
- Current Chat Transcripts will not get saved unless the current chat tab is closed.
Step 9: Supervisor Panel:
For Monitoring Live Agent User Go to Tab > Live Agent Supervisor

Live Agent Supervisor can monitor the Live Agent User. We can define the filter settings for Users in the Live Agent Configuration Settings.
- Live Agent Supervisor can monitor the Queue Length.
- Supervisor can change the filter and view Live Agent Users.
- Using the View action Supervisor can see the Live Chat between Visitor and Live Agent User.
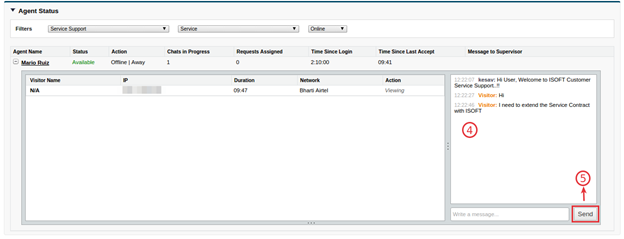
- Live chat between Live Agent User and Visitors.
- Supervisor can send Private message to Live Agent User during the chat between Live Agent User and Visitor.
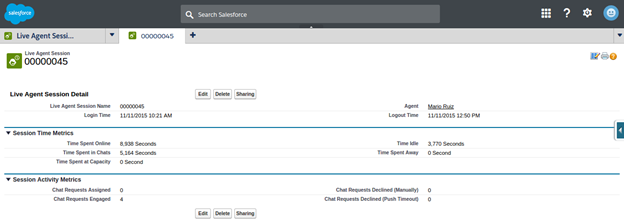
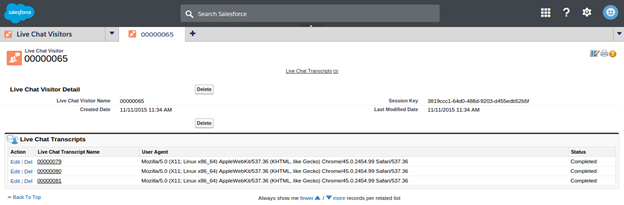
Step 10: Live Agent Objects:
- Live Agent Sessions
- Live Chat Transcripts
- Live Chat Visitors
Step 10.1: Live Agent Sessions:
Live Agent Session contains details about the Time spent online, Time spent on chat, Live Agent Idle Time, and etc.
Step 10.2: Live Chat Transcripts:
It contains details about the Chat Start Time, Chat End Time, associated Account, Case and the Chat between Visitor and the Live Agent User.

Step 10.1: Live Chat Visitors:
It contains details about the visitor.
Conclusion:
Live agents can use the Salesforce console for responding to chats from the customers or visitors in real time. So that customers or visitors can get quick solutions. Thus, implementing Live agent increases agent’s productivity and organizational efficiency overall.
Reference:
