What is Amazon Connect?
Amazon Connect is one of the services provided by Amazon Web Services (AWS) which is an easy-to-use omnichannel cloud contact center that provides superior customer service at a lower cost. The Amazon Connect instances can be created over numerous availability zones and build multiple paths to telecom providers for fault tolerance and high availability.
We can create personalized experiences for your customers using omnichannel communications. We can dynamically offer chat and voice contact, based on factors like customer preference and estimated wait times. Agents meanwhile efficiently can manage all customers from just one interface they can chat with customers and respond to tasks as they are routed to them.
The self-service graphical interface in Amazon Connect makes it easier for non-technical users to design contact flows, manage agents, and track performance metrics with no specialized coding skills required. By using the advantage of the Amazon Web Services ecosystem of services such as AWS Lambda, Amazon Lex, Amazon Contact Lens, Amazon Transcribe and other services in the Amazon toolbox, we can build your next generation contact center solution which reduces costs and increases our capabilities.
AWS often lets us pay-as-you-go pricing which enables us to pay only for what we use and here in our case they charge the customers to pay by the minute for Amazon Connect usage and any associated telephony services associated with it.
Step 1: Create a New Amazon Connect Instance
To create an Amazon Connect Instance, first we need to have an AWS Account. If you don’t have one, then please follow this link to create one. After successfully creating an AWS Account, search for Amazon Connect from the list of available services.
Before Creating an Amazon Connect Instance, check your region at the top of the console because Amazon Connect isn’t available in all regions. So, choose a region which is near to you for better experience.
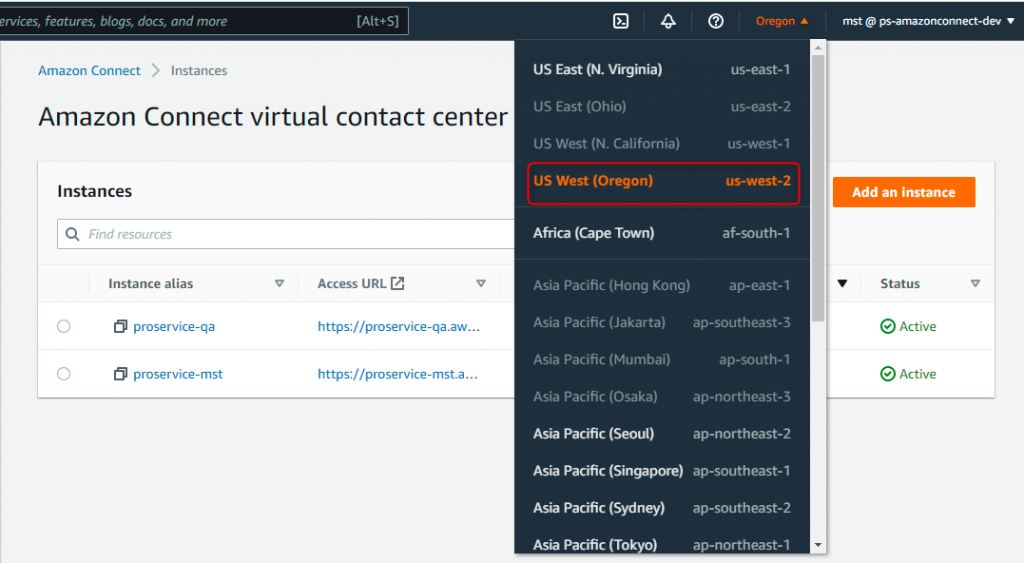
Now, we shall start setting up the instance:
- If this is the first time you are creating an instance, then click Get started or if you already have an instance you’re taken to the list of instances as shown in above screenshot; then, click Add an instance.
- On the Set identity page, select Store users within Amazon Connect. In the Access URL field, enter a unique value and this value becomes your instance name. Then, click Next.
- On the Add administrator page, select Specify an administrator; then, fill the form to create an admin account and note the admin username & password; then, click Next.
- On the Set telephony page, check the boxes for both Allow incoming calls & allow outbound calls; then, click Next.
- On the Data storage page, leave the defaults and click Next.
- On the Review and create page, double-check your Access URL and administrator name matches your notes; then, click Create instance.
Step 2: Configure the Newly Created Amazon Connect Instance
In a minute or two a Success screen appears with Get started button; click on it, then you will be directed to your Amazon Connect instance and notice the URL is your access URL.
- If this is the first time in this instance, you are greeted by a welcome message; then, click Let’s go.
- You will be directed to Claim a phone number page, In the Type dropdown, select Direct Dial.
- Select a number from the Phone number dropdown and note this number; then, click Next.
- If the browser asks Allow access to microphone, kindly give allow access.
- If you need an additional Phone number, you can always claim by selecting Routing icon in the left and click phone number; then, follow the above steps and in Contact Flow /IVR, select Sample Inbound Flow; later, you can assign your own customized flow.
Test Your New Instance with a Phone Call:
- Click the Phone icon in top right; it will pop up the Contact Control Panel (CCP) in which you can receive inbound and make outbound calls.
- Set the agent state to Available.
- Call the number you claimed using another phone. When the voice prompts, press 1 for an agent then press 1 to move to the front of the queue and then press 1 once more to get connected.
- Your Contact Control Panel (CCP) receives an incoming call; click green button to Accept call; then after speaking, click red button to End call. The Contact Control Panel switches to the After Call Work mode which gives time to the agent to finish tasks; then, Click Clear contact.
- Now try an outgoing call, click Number pad, and enter a phone number where you receive calls; then, click Call.
- When your phone rings, answer it. After speaking hang up your phone or click End call in the CCP.
Step 3: Install the Amazon Connect CTI Adapter in Salesforce Org
Follow the steps below to install the CTI Adapter:
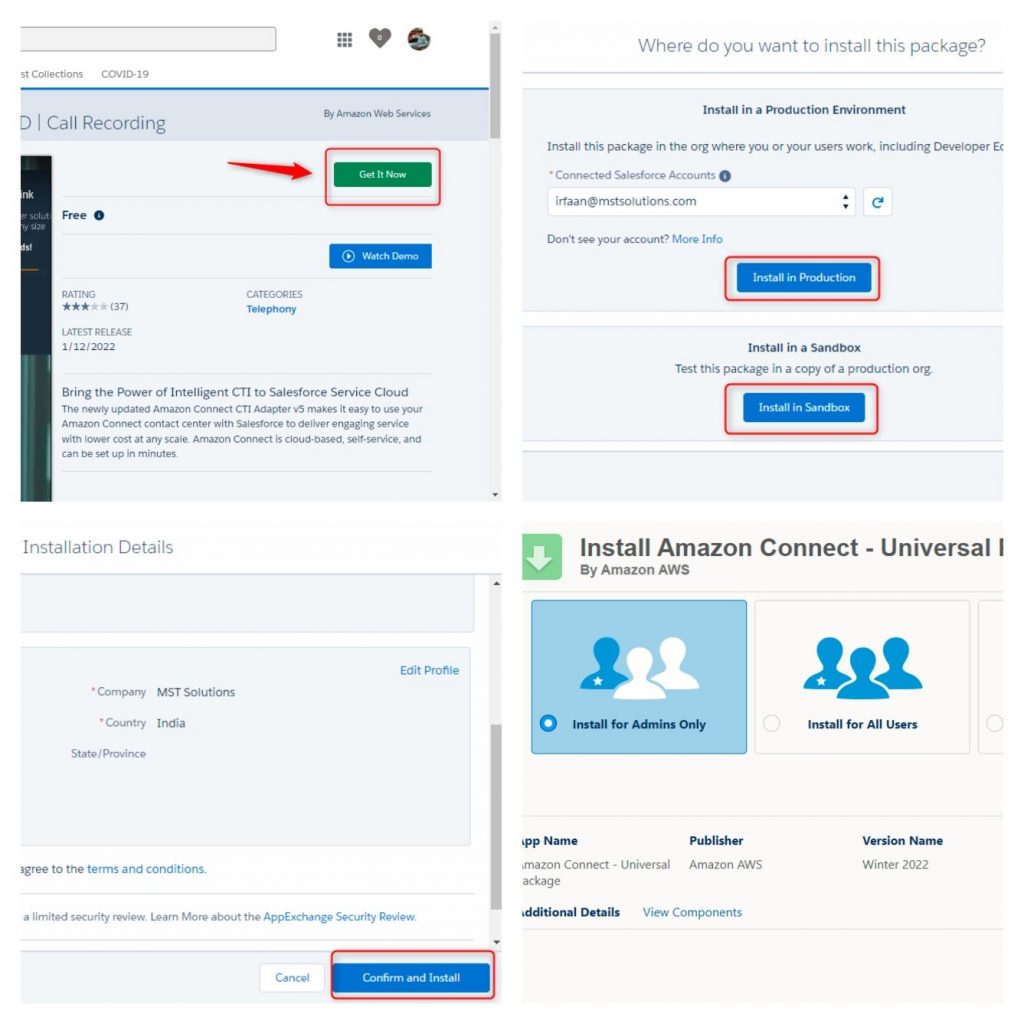
- Click this link or Search for this Id “04t4p000001wt6eAAA” in AppExchange and then click Get It Now.
- It will ask for AppExchange to login with your trailblazer account and then choose an Org where you want to install; so, select either Install in Production or Install in Sandbox and then click Confirm and Install.
- You will be redirected to the Salesforce login page. Login with your org credential and select Install for Admins Only then click Install.
- It might take a few minutes to install; so, when it is finished you see a confirmation page and get an email to the address associated with your Org.
Step 4: Configure the Salesforce Call Center
In the upcoming steps, you are going to switch between AWS and your Salesforce Org; hence, keep both environments open in different tabs in the browser.
- Go to Setup. Then copy the URL in the browser and save your domain in a separate place. We will be using it in later steps.
- Note: While saving your domain, it should start with the https:// and end at .com e.g., the domain you save should look like this: https://yourdomain-dev-ed.lightning.force.com
- In Setup, enter Visualforce Pages in the Quick Find box; then, click the AC_LightningAdapter link and then click the Preview button. Copy the preview link URL and save it to use in the next step.
Configure Your Call Center:
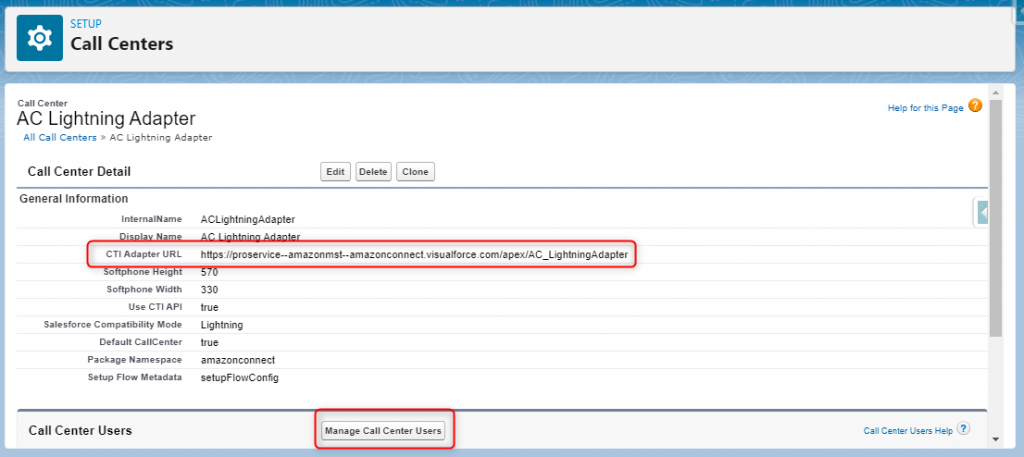
- Now go back to Setup and enter Call Centers in the Quick Find box; then, click into your new call center AC Lightning Adapter and click Edit.
- In the CTI Adapter URL field, replace the current value with the Lightning Adapter URL you have saved in previous step and click Save.
Manage Call Center Users:
- In the same AC Lightning Adapter setup page, click Manage Call Center Users; then, click Add More Users.
- Set search criteria to find your own Salesforce user like FirstName | Contains | name of your user; then, click Find.
- Check the box next to your username; then, click Add to Call Center.
Assign Amazon Connect Permission Sets to call center users:
- In Setup, enter Permission Sets in the Quick Find box and Click AC_Agent à Manage Assignments à Add Assignments.
- Check the box near your name and check for any other users you wish; then, click Assign and Click Done.
Step 5: Configure the Service Console
To use the CCP, you must activate the console softphone as a utility
- In Setup, enter App Manager in the Quick Find box. In the Service Console, click the disclosure triangle and click Edit.
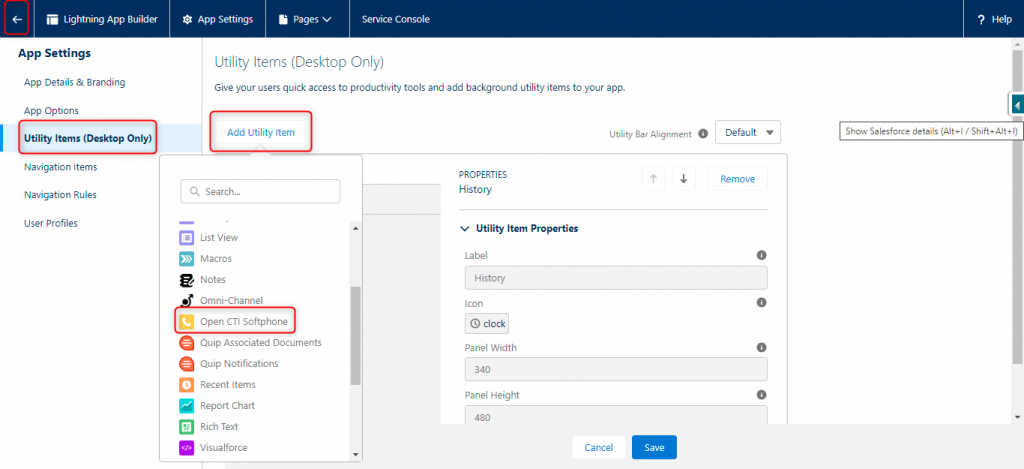
- Now, click Utility Items; then, click Add Utility Item. From the list of components, select Open CTI Softphone; then, click Save and click Back.

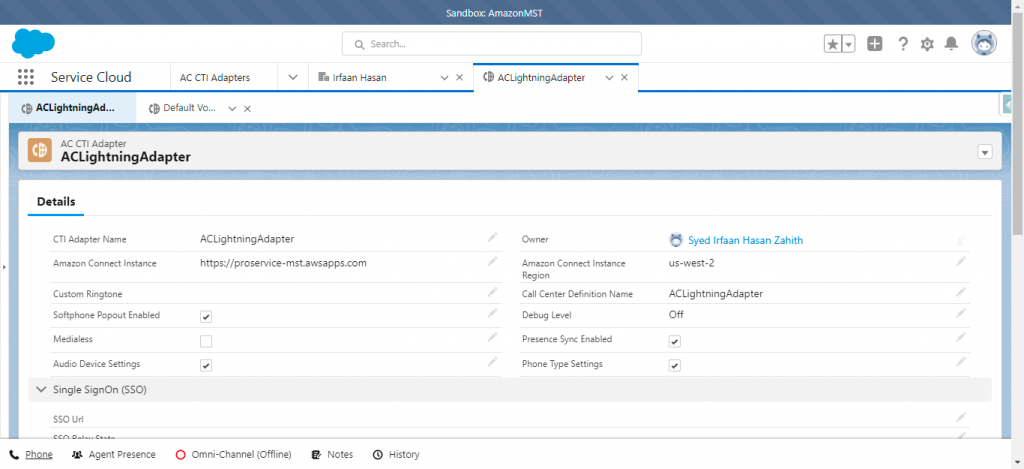
Configure ACLightningAdapter Record:
- Open the AC CTI Adapters Object from App launcher. If Recently Viewed is selected, then click on the drop-down and select All; then, Click on ACLightningAdapter.
- If you cannot find ACLightningAdapter, you need to set it up manually; hence, create a new record with below attributes.
- CTI Adapter Name: ACLightningAdapter
- Amazon Connect Instance: your Access URL to amazon connect
- Call Center Definition Name: ACLightningAdapter
- Check the checkbox for Softphone Popout Enabled and Presence Sync Enabled.
- Let other fields remain the as default and click Save.
Configure Cross-Domain Access:
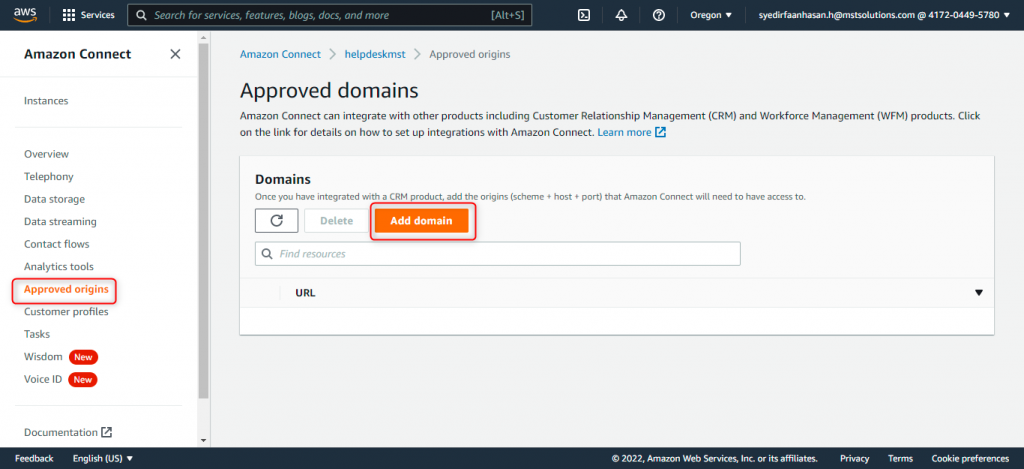
- Log into AWS Console and navigate to Amazon Connect. Click your Instance Alias.
- On the left-hand side, click Approved origins and on the main page, click Add Domain and enter your Org domain which you copied earlier — it looks like this https://yourdomain-dev-ed.lightning.force.com and Click Add.
- Click Add Domain again. Enter your call center domain and then remove everything after visual.force.com; so that, it looks like this https://yourdomain-dev-ed–amazonconnect.visualforce.com and then click Add.
Step 6: Test the Amazon Connect CTI Adapter in Salesforce
Sign into Amazon Connect from Service Console:
- Click on the Phone utility bar at the bottom of Service Console; then, click Sign In to CCP.
- A pop-up screen will open. It will prompt you to sign into your Amazon Connect instance.
- Sign in using your Amazon Connect instance credentials; after authenticating, it will merge with the Softphone automatically.
Make an Outbound Phone Call:
- Open an Account or Contact record and make sure it has the phone number; for testing purpose, fill it with your personal number.
- You can see a phone icon next to the phone number and if the phone widget shows an error like a greyed out one, wait a minute or two and then refresh the page.
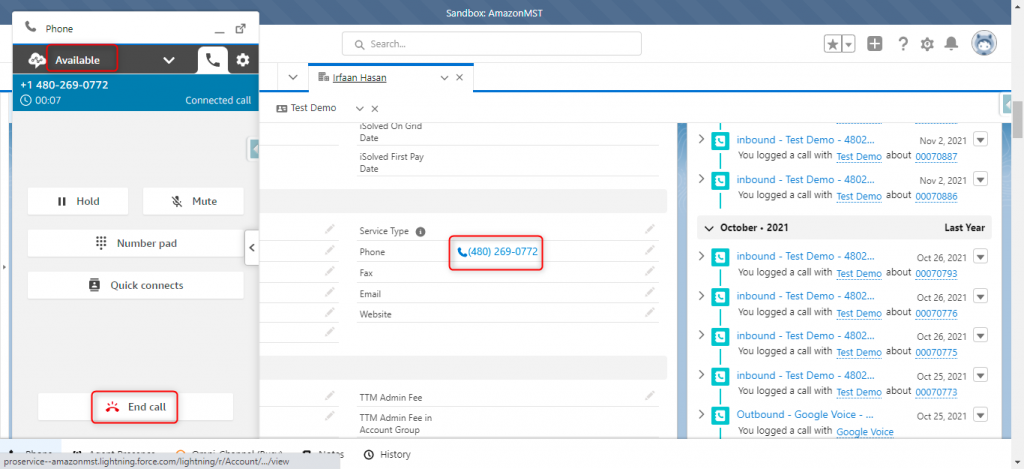
- Click the phone number on the account or contact record to make an outbound call.
- Answer the phone call and it will be connected; then, click End Call.
- Once the call is completed, the CCP goes to AfterCallWork status where you can perform follow-up activities such as logging the call; then, Click Close contact after completing the activities; so that, your status will be set to Available and ready to take next call.
Receiving an Inbound Phone Call:
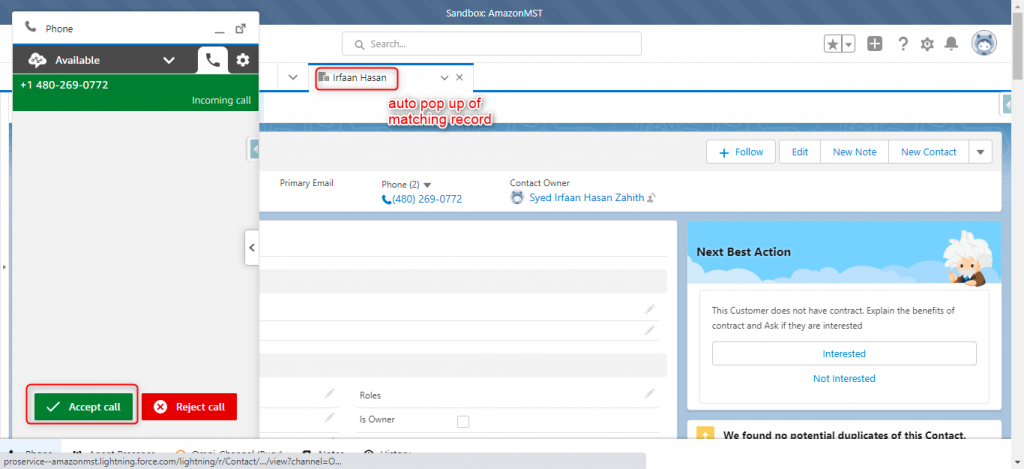
- If an available agent receives a call, the CCP pops up automatically and opens any records that match the caller ID.
- Set your status to Available and from another phone place a call to the phone number you claimed in your Amazon Connect instance while configuring.
- Follow the voice prompt and press 1 for an agent; then press 1 to move to the front of the queue, and finally Press 1 to get connected.
- The Softphone in your utility bar will pop up automatically. Click the Check Mark button to accept the call; then, once connected, click End Call.

Conclusion:
Now, we have integrated Amazon Connect with Salesforce and tested its functionality successfully, but there are still lot more features we can use with Amazon Connect like create a Case & Task for every Inbound and Outbound Calls with CTI Flows, AC CTI Adapters Object in Salesforce, link CCP & Omni-Channel using Presence Sync Rule, import Metrics as Reports from Amazon Connect, import call recordings and its transcription in a separate Object etc. which we shall see in later articles.


