What is data migration testing and why we need it?
Data migration testing is the process of ensuring data accuracy while migrating data from a legacy system to a new system. Generally, the data is acquired from Salesforce as two datasets – Target and Source. It is crucial to ensure in this process that there is no data loss or data integrity issues. By performing a Data Migration testing, we can ensure that we don’t lose any data. The data migration testing process also must take minimal time and should not disrupt the rest of the system function.
Challenges in Data migration and Testing:
- Data Quality – data may get truncated or would have mapped with different fields
- Data Loss – fields may be missing values
- Salesforce performance issues while generating bigger reports like generating a report that has millions of records
Tools to be used:
- Data Loader – To fetch the records
- Salesforce inspector – For generating the reports and exporting it to excel
- Microsoft Excel – To test the exported data
Methodology:
Data Pulling Method:
- Go to dataloader and log in using the Salesforce source org (from which the data is being migrated)
- Select Export and New Task
- Select the object that must be tested and check the select all options to retrieve the SOQL (Salesforce Object Query Language) Query
Data Pulling Flowchart:


Exporting the Data:
- Log into the source salesforce org
- Go to the Salesforce inspector and input the SOQL queries
- Click Export
- Select Copy (Excel format) and feed the data into an excel sheet
Exporting Data Flowchart:


Now, log into the target org and repeat the process to export the data
Testing the data
Step 1:
Here, Sheet 1 has the data from the source and Sheet2 has target data

Step 2:
Data Preparation: Select a column (should be the same in both the fields) in both sheets and arrange it either by ascending or descending order. Here, we have chosen the column/field NAME in both the sheets.
Step 3:
Select the entire sheet in the source and go to Conditional formatting. Select highlight cell rules
Step 4:
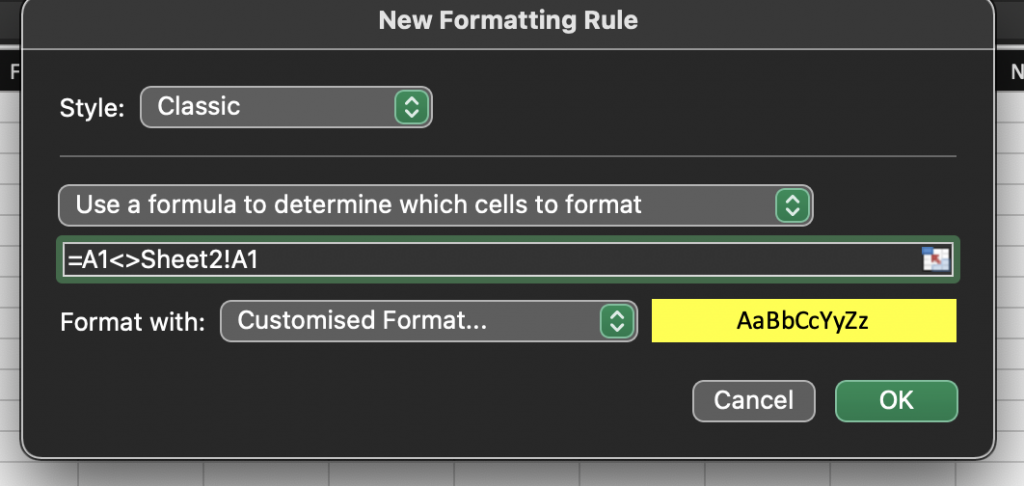
In the new formatting rule box, select “only format cells that contain” and in the format with option select “customized format” to choose the fill color of your own wish and select ok.
Note: Formula = A1<>Sheet2! A1 must be entered as shown below in the formatting rule box

Step 5:
Now, all the cell values which don’t match between the two sheets will get highlighted in the Sheet1 which means there is a data discrepancy in the migrated data

Additional Tip:
If there are millions of data, instead of scrolling down manually through each field / column to verify the highlighted cells, we can select the filter on the field and choose filter by cell color. If the data is matching, there will be no highlighted cells, so the filter by color option will appear as disabled or if data has differences, it will be enabled as shown in the below screenshot.

Conclusion:
Instead of testing randomly or doing sample testing while handling higher volume of data in Salesforce, one can opt for this way of testing. This is one of the best ways as it ensures high quality with high testing coverage in a shorter time comparatively.
References:


