Introduction:
The Conga Sign is an E-signature application. Users can start an eSignature process from selecting Salesforce objects by adding signature tags. We can choose a maximum of 10 recipients and specify the signing order Signing activities are tracked and updated in Salesforce.
Prerequisites:
- Install the Conga Sign package in your Org.
Configuration of Conga sign
Step 1:
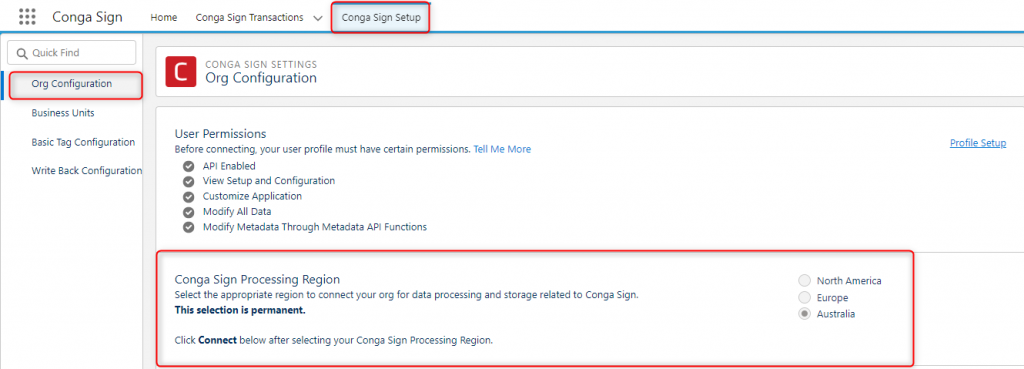
- It is an Automatic Configuration from the Conga Sign Setup tab.
- In the Conga Sign Processing Region section, we need to select a specific region to connect to for data processing and storage related to Conga Sign. Generally, Conga suggests selecting the same region as your Salesforce org.
Step 2:
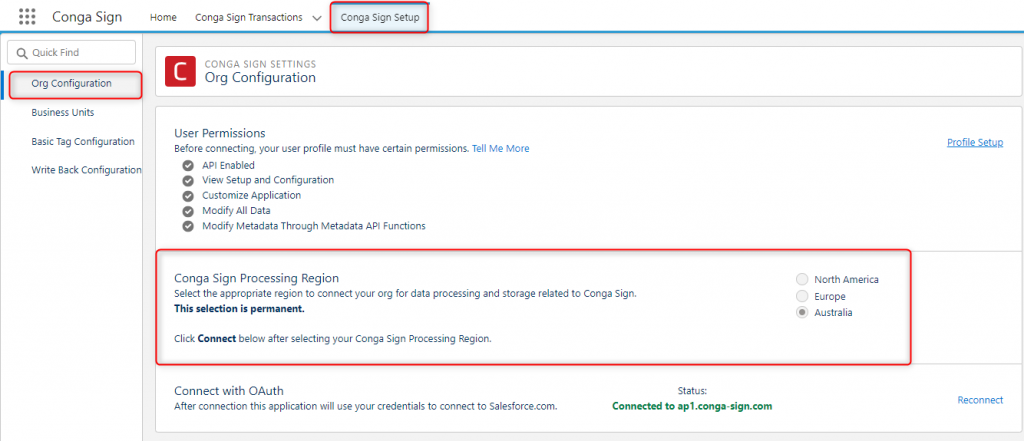
- After selecting a Conga Sign Processing Region, click Connect in the Connect with OAuth section and click Allow.
Step 3:
- Go to Organization Configuration section and click Start Automatic Configuration.
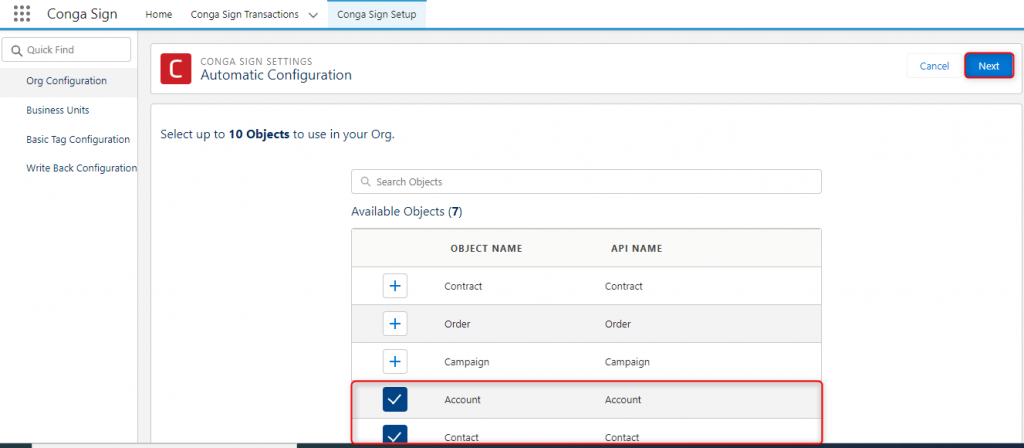
- Select the object(s) which we want to utilize with Conga Sign (we can select up to 10 objects. If we need to add more than 10 objects, we must run Automatic Configuration again).
- Click
icon to add an object(s).
- Click Next.

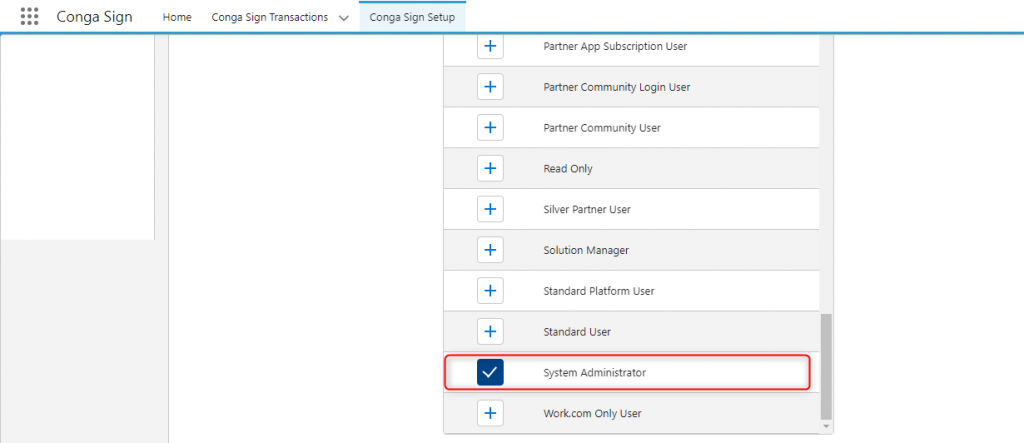
- Select the profiles to use Conga Sign (we can select up to 5 profiles. If we need to add more than 5 profiles, we must run Automatic Configuration again).
- Click
icon to add profile(s).
- Click Save.

Step 4:
Adding a Sign button to the page layout.
- Navigate to Setup > Objects and Fields > Object Manager > Account > Page Layouts and select the page layout.
- Click Buttons or Custom Links.
- Drag and drop Send with Conga Sign to the Custom Button area on the page layout.
- Click Save.

Step 5:
The Guided Signing feature allows signers to navigate to the locations of each assigned Conga Sign tag in the document while signing. By default, it is in the disabled state, and we need to enable the Guided Signing setting from Conga Sign Setup.

Step 6:
Reassigning signers are useful for the designated signer who would like to pass signature responsibilities to a different recipient within their organization.

Step 7: Final Document Delivery
We need to choose how completed documents are delivered to recipients. The following three final document delivery methods are in the Final Document Delivery section of Conga Sign Setup.
- PDF Attachment – Delivered as a PDF attachment in an email.
- Download Link – The download link will expire five days from when it is delivered in an email.
- Attachment and Link – The Document is attached as a PDF file in an email and is also downloadable as a PDF file through a download link.

Step 8: Business Units
It is useful to enable custom branding for specific organizations within your org.

Steps to configure Business Units:
- Navigate to Conga Sign Setup.
- Click Business Units.
- Click Edit Business Unit next to a specific Business Unit.
- Modify the existing values in the Business Unit Name and Business Unit API Name fields or enter new field values.

- Click Upload Files to upload your Company Logo for the Business Unit.
- Set the email branding for the Business Unit by modifying the values of the following fields.
- Email Display Name
- Subject
- Message
- Configure the contact information for the Business Unit by entering values in the following fields.
- Company
- Address
- City, State, and Zip/Postal Code
- Country
- Phone Number
- Website

- Click Save.
- Default Business Units are set to active by default. You must activate non-default Business Units to use them in Conga Sign Transactions and emails.
Sender Email Notification
| Options | Purpose |
| Transaction is Complete | Sends an email notification when Transaction has been completed by all Signers. |
| Transaction is Cancelled | Sends an email notification when Transaction has been canceled by the Signer or the Sender. |
| Transaction is Expired | Sends an email notification when Transaction has reached its marked expiration date. |
| Transaction is Sent | Sends an email notification when the Transaction has been sent out for signature. |
| Transaction is Reassigned | Sends an email notification when the recipient has chosen to reassign the signer. |
| Transaction is completed by Signer | Sends an email notification when each Signer has completed signing. |
| Transactions are viewed by Signer | We have two options: Document view first time only Document view every time |

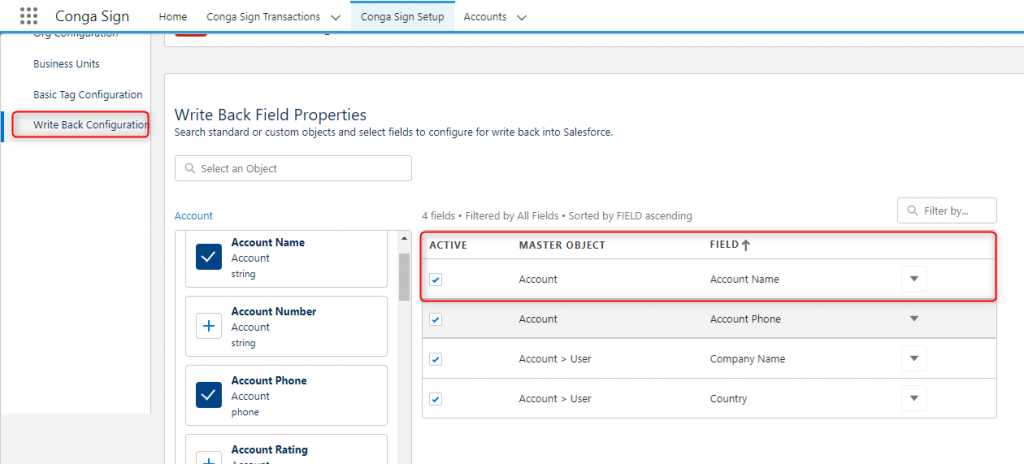
Step 9: Write Back Configuration tab
- Signers can search for both standard and custom objects in Salesforce, choose fields associated with those objects that they would like to make available for write back, and define basic properties for how those fields should work when used as tags in a Conga Sign document.

Step 10:
- Once we completed the conga sign setup, we need to navigate corresponding Account to generate the document.

- Click Send with Conga Sign Button it will navigate to Create Transaction.
Step 11: To send documents for eSignature
- We can see all the Files by using the search feature.
- Click Upload File to upload any Word or PDF file. We can also drag and drop the file.
- It will show all documents attached to that record. Select the documents that we want to send for an E-Signature.
- Enable the Only Show Selected toggle to display only the selected documents in the Available Documents list.

Step 12: To add a New Recipient in the Create Transaction User Interface
- Navigate to the Create Transaction user interface by launching a Conga Sign.
- Click Create New Recipient.
- Complete the required fields.
- First Name
- Last Name
- Email Address
- Click Save.
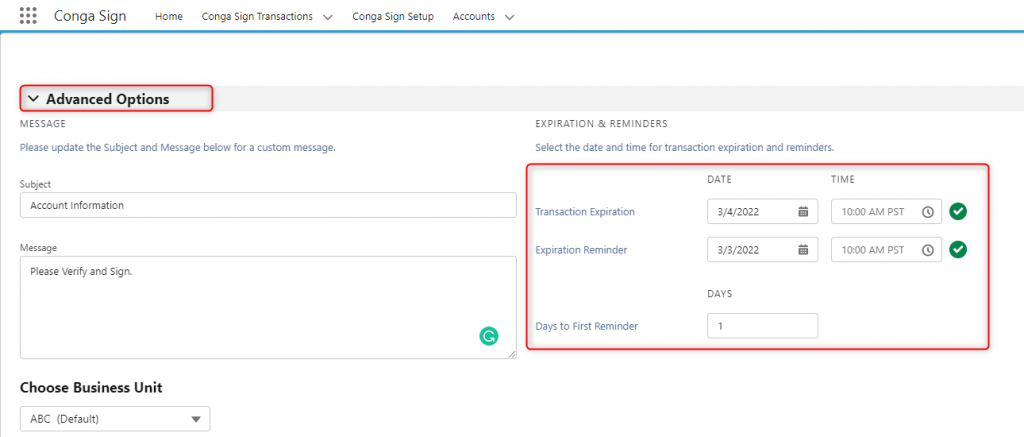

Step 13: To add Advanced Options
- Set the date and time for transaction expiration and reminders. we can configure the following fields:

Step 14:
- If We need to add tags, click Preview and Tag.

Step 15: Conga Sign Signature Tags
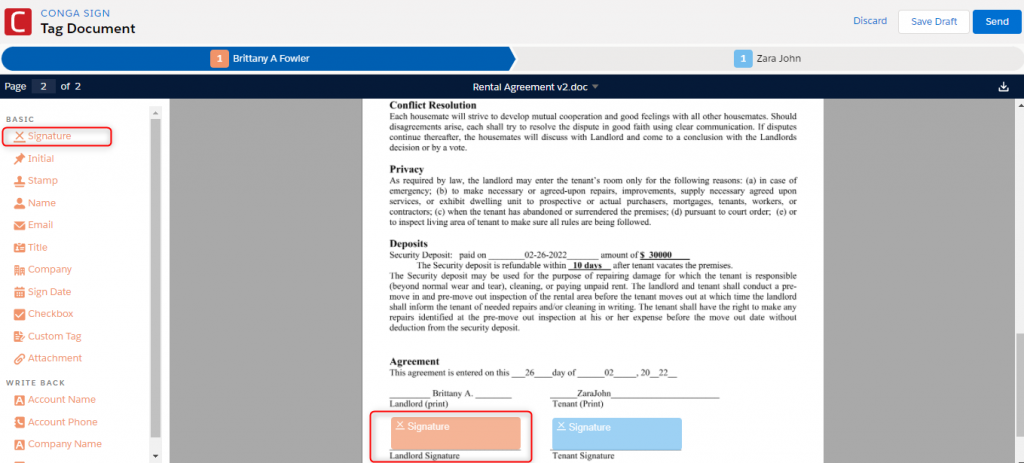
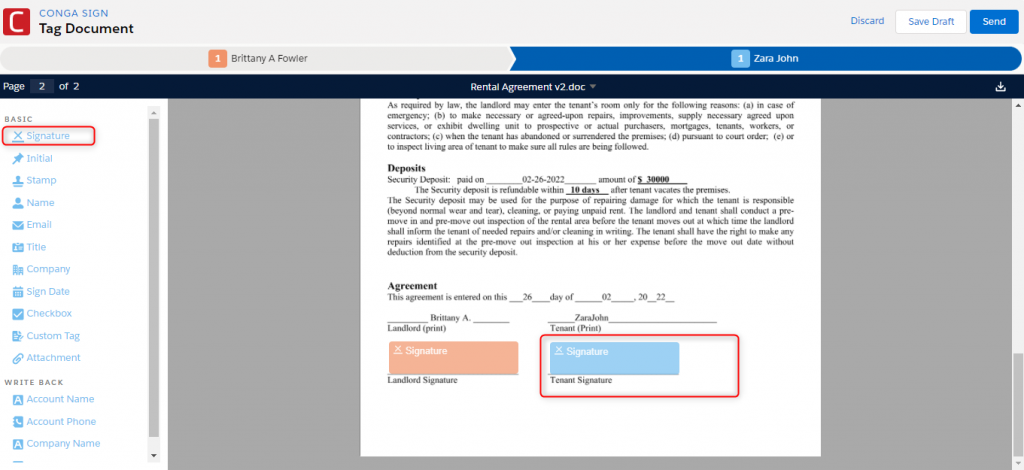
- We can add standard and custom tags by dragging and dropping a tag in the Preview and Tag screen of Conga Sign. The tags can be specified as required or optional for signers to sign. If the tags are set to be required, a signer must complete the tag in a Conga Sign transaction.
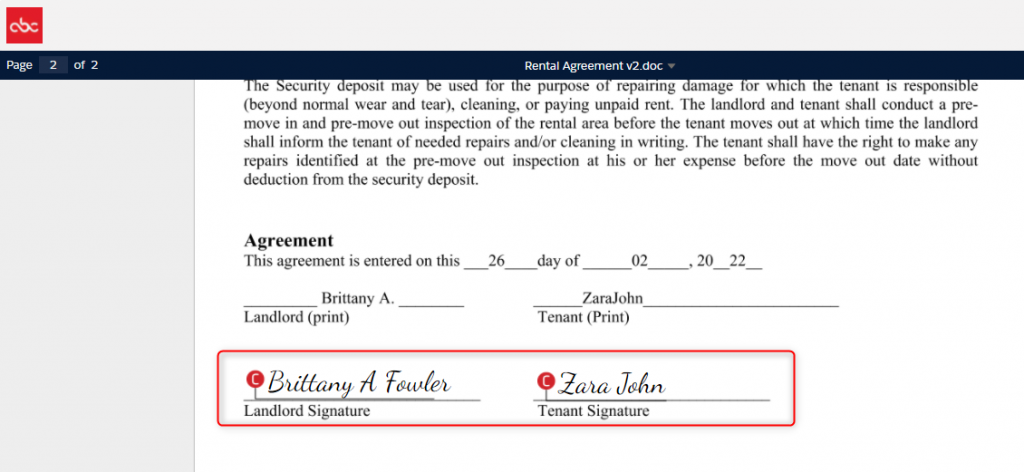
- For example, we are going to Drag and Drop the Signature tags to get the Landlord and Tenant Signature.
- Click Send.
Step 16: To sign a document received using Conga Sign
- Open the email you received from Conga Sign.
- Click View Document.

- View the electronic record disclosure and click I Agree.

- Click on the Conga Sign tag to complete the Landlord Signature–the same steps for Tenant.
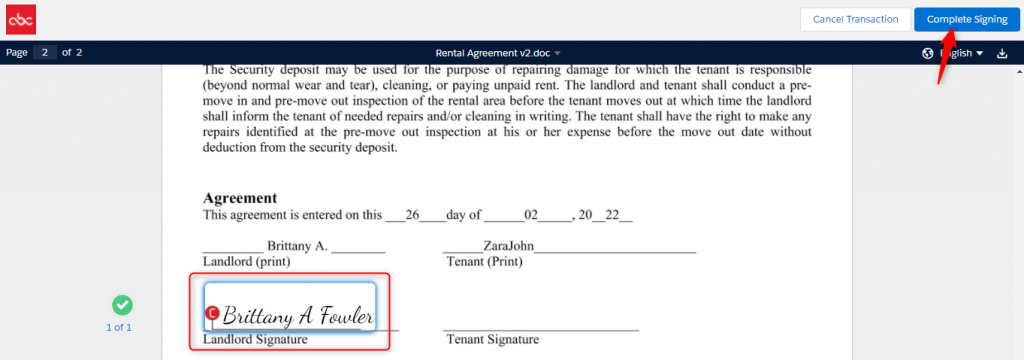
- Click Complete Signing once all tags are complete.
- The signing process is complete. If all recipients have finished signing, we can click the Download Document to save a copy if you choose.

Step 17:
To cancel a Conga Sign Transaction as a Salesforce User
- Navigate to the related Conga Sign Transaction record and click the Cancel Transaction.

To cancel a Conga Sign Transaction as a Signer
- In the Signing user interface, click the Cancel Transaction button.
- Enter a description for cancelation in the text box and click the Confirm button to execute the cancelation.
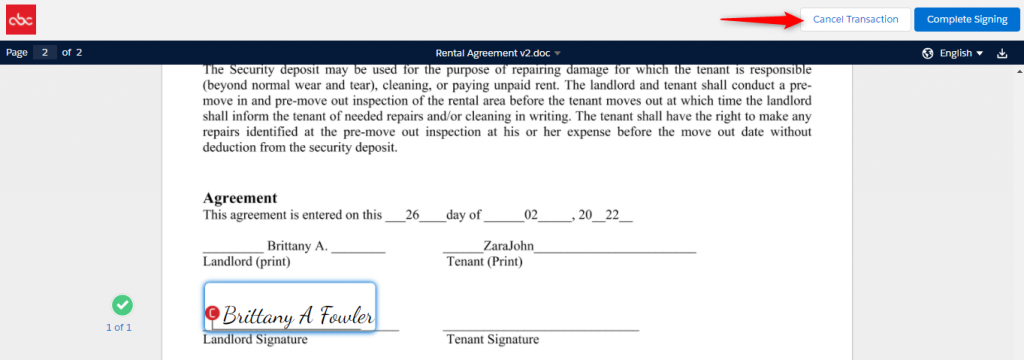
- A Conga Sign Transaction cannot be cancelled once it is Completed or Cancelled.

Step 18: Audit Trail
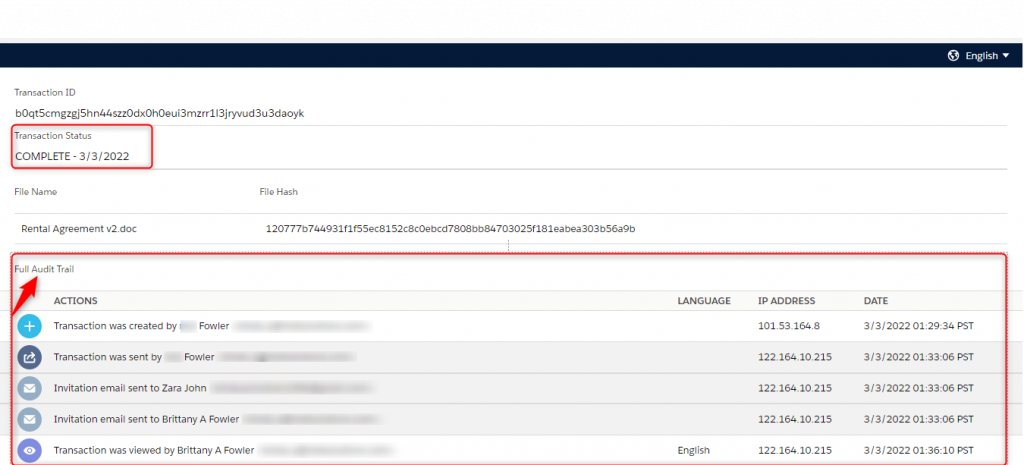
- Every Conga Sign transaction contains a unique audit trail providing detailed information about events related to that specific transaction.
- File Name
- Transaction Status
- Transaction ID
- When a document is sent or signed using Conga Sign, an email confirmation containing a link to the audit trail is automatically sent to all recipients and the sender. Clicking this link will take you to a unique link containing that specific transaction’s audit history.

References:
- https://documentation.conga.com/sign/spring-21/installing-conga-sign-package-143895294.html


