Azure Active Directory (Azure AD) is a multi-tenant service offered by Microsoft which is used to access management service running in a on-premises environment. As a developer, you can use Azure AD which provides APIs that can help to build personalized app experiences using existing organization data.
Why am I reading about Azure AD?
This article is about connecting organizational app’s data (I chose Outlook user’s basic profile) to your Salesforce cloud (contact records).
For that we must create a protected pathway as known as API; here comes the Azure AD.
Azure AD’s role:
Azure AD is used to create an app which is going to relate to one of it is sibling cloud app which is Outlook. This app will provide an API to connected with the Salesforce.
How the data are going to be fetched from outlook?
Answer is Microsoft Graph.
Azure AD can get data from apps like Dynamic CRM, SharePoint, Office 365, One Note, etc. directly by just granting access to the respective app with certain permissions. To get outlook data, Microsoft comes with a great querying tool called Graph Explorer.
Salesforce has a great querying tool called SOQL and SOSL to get a data with the given parameters. Similarly, Microsoft’s Graph comes with very basic querying methods and with its own style of syntaxes.
Time to develop the app
Step 1: To develop an Azure AD app, it is must to have a Microsoft account. Login to the Azure Portal. In the portal, you can find the Azure Active Directory, if you could not just use the menu bar to list out the services.
Clicking on the icon on the portal will get you to an overview page. Here, you can see the list of managing options like Roles, Devices, Licenses. The most important part you must notice is the Tenant ID. What is a Tenant ID? Why Do I need that? Answer is on the following steps.
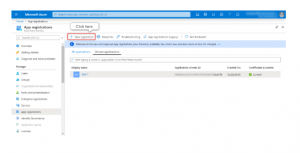
Step 2 (App registration): In the left menu list, click on the App registration to create your own app.

App Registrations page:
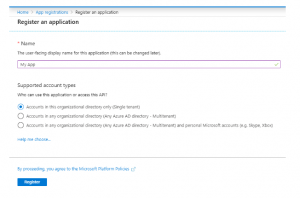
Give your app a nice name and leave other options as it is. By default, supported account type is single tenant, Register.
Creating an app will redirect to the app’s overview page–which comes with certain gibberish keys like Application ID(client ID), Tenant ID which are required to make a REST API callout.
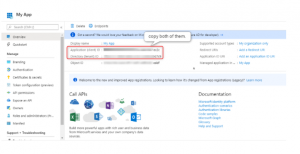
To make a REST API callout to Azure directory, it is must have (basic OAuth Securities),
- Azure Client ID (Application ID)
- Azure Tenant ID (Directory ID)
- Your apps Client Secret
- Scope
- Grant Type
What are Client ID and Tenant ID?
Client ID is a public (only inside your organization) identifier of your app and it makes sure that callout can only be done someone inside our organization. Key size varies out by API’s. Azure is currently using 36 characters including hyphens.
Tenant ID is a globally unique identifier which specifies in which organization’s Azure your app sits under.
So, both IDs point you to your app, but logging in your app requires one more key, Client Secret.
What is Client Secret? How can I get one?
Client Secret is a “secret” key used to authenticate your API callouts.
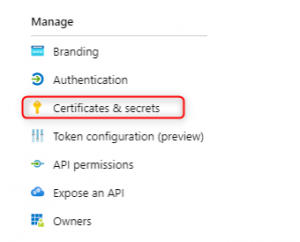
You must create a client secret to access your API. For that, navigate to Certificates & secrets in the portal’s left menu bar.
Clicking on  will prompt to create a client secret.

[Text Wrapping Break]describe you secret and chose any expiry date as per your need.
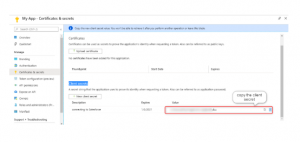
So now we got the three keys. Still not good to authenticate if you do not describe where to authenticate (key without knowing its lock is useless),;here comes the scope.
Here the scope is the graph explorer, https://graph.microsoft.com/.default copy the link.
Grand type will define the role of callout. The value is “client_credentials” (do not miss the underscore)
Client ID : copied from app overview menu
Tenant ID : copied from app overview menu
Client Secret : copied from certificates and secrets menu
Scope : https://graph.microsoft.com/.default
Grand Type : client_credentials
Make sure that you have got every key before proceeding.
Step 3 (choosing the data to be shared):
Navigate to API permission in the menu to grant permission to read data of your outlook. Click on
“+ add a permission” to create a read permission of your outlook data.
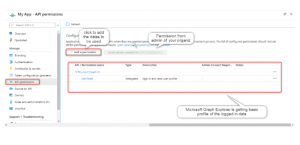
Select Microsoft Graph:

Grant read all user permission with application permission:
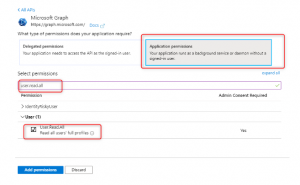
Choose Application Permissions > search user.read.all > select user.read.all as mentioned in the picture to add permission.
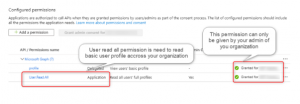
Your application is good to go.
Step 4 (Connecting Salesforce):
Needs:
- Custom Metadata Type to maintain your API keys.
- Named Credentials to point the links to make callout.
- Apex Class to make a callout.
- A lightning Component to display the output.
Custom Metadata type:
Custom metadata type should have four field. They are ID, Tenant ID, Client Secret, Scope, Grant type values that we already got while creating the app.

HINT: Custom Metadata Type comes in handy if you need to change the key or create another azure app in future.
Named Credentials:
Create two named credentials,
- Graph Explorer – https://graph.microsoft.com/v1.0/users
- Microsoft Online – https://login.microsoftonline.com
With following settings and url
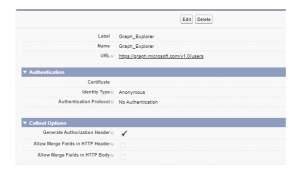
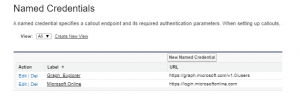
Apex class:
- public with sharing class Outlook_Contact_Integrated_Lookup_AC {
- // requesting/invoking an access token
- public static String requestAccessToken(){
- Azure_Active_Directory_Auth__mdt azureAuth = [SELECT Azure_Client_ID__c, Azure_Client_Secret__c, Azure_Scope__c, Azure_tenant_id__c, Azure_Grant_Type__c FROM Azure_Active_Directory_Auth__mdt WHERE DeveloperName = ‘My_Active_Directory’];
- String strbody = ‘client_id =’ + azureAuth.Azure_Client_ID__c + ‘&client_secret=’ + azureAuth.Azure_Client_Secret__c + ‘&scope=’ + azureAuth.Azure_Scope__c + ‘&grant_type=’ + azureAuth.Azure_Grant_Type__c;
- HttpRequest request = new HttpRequest();
- setTimeout(120000);
- String endPoint = ‘callout:Microsoft_Online’ + ‘/’ + azureAuth.Azure_tenant_id__c + ‘/oauth2/v2.0/token’;
- setEndpoint(endPoint);
- setMethod(‘POST’);
- setBody(strbody);
- Http http = new Http();
- HttpResponse response = http.send(request);
- if(response.getStatusCode() == 200) {
- Map<String, Object> responseGetBody = (Map<String, Object>) JSON.deserializeUntyped(response.getBody());
- return (String) responseGetBody.get(‘access_token’);
- }
- return ‘Error Authenticating :’ + response.getStatus();
- }
- //get contacts from outlook
- @AuraEnabled(cacheable=true)
- public static Object getOutlookContacts(String searchKeyword) {
- String endPoint = ‘callout:Graph_Explorer’ + ‘?$filter=startswith(displayName%2C%27’ + searchKeyword + ‘%27)%20or%20startswith(givenName%2C%27’ + searchKeyword + ‘%27)%20or%20startswith(surname%2C%27’ + searchKeyword + ‘%27)%20or%20startswith(mail%2C%27’ + searchKeyword + ‘%27)%20or%20startswith(userPrincipalName%2C%27’ + searchKeyword + ‘%27)’;
- String accessToken = requestAccessToken();
- HttpRequest request = new HttpRequest();
- setTimeout(120000); // Maximum Timeout Period
- setEndpoint(endPoint);
- setMethod(‘GET’);
- setHeader(‘Authorization’, ‘Bearer ‘ + accesstoken);
- setHeader(‘applicationCd’, ‘SALESFORCE’);
- setHeader(‘Content-Type’, ‘application/json’);
- setHeader(‘accept’, ‘application/json’);
- Http http = new Http();
- HttpResponse response = http.send(request);
- if(response.getStatusCode() == 200) {
- Map<String, Object> responseGetBody = (Map<String, Object>) JSON.deserializeUntyped(response.getBody());
- return responseGetBody.get(‘value’);
- }
- return (Object) ‘Error on searching contact :’ + response.getStatus();
- }
- }
Apex classes uses two methods:
- requestAccessToken – to get temporary access token to authenticate the callout
- getOutlookContacts – to make callout and get the contacts of outlook
Using the following, we have connected the outlook to out apex class. Response is received as JSON and returned the contact values as JSON isolating the tokens and other details to front end.


