Introduction:
We may already have heard that we can’t make API calls directly from Lightning Components, and that those calls must be made via Apex. Well, today I needed to call the Tooling API from Apex, so I started coding something that I thought would be simple. All I needed to do is write some code like this
Process Explanation:
In process explanation, we can make callout directly from lightning component using the below process.
HTTP h = new HTTP ();
HTTP Request req = new HTTP Request ();
HTTP Response resp = new HTTP Response ();
req. set Method(‘GET’);
req. set Header (‘Authorization’, ‘Bearer ‘ + UserInfo.getSessionId());
req. set Endpoint (URL.getSalesforceBaseUrl(). toExternalForm () + ‘/services/data/v39.0’);
resp = h. send(req);
System. Debug (resp. get Body ());
I tested this code in Execute Anonymous and it worked, but when I hooked it up with my component, I found out this error: INVALID_SESSION_ID: This session is not valid for use with the REST API.
I asked about this question and I was pointed to the document which gave me the solution: use Named Credentials!
I remember seeing this Named Credentials and how cool they were, but I had not set them up before to make a call back to my ORG to perform API operations, and as I ended up learning it’s quite a complex process. I had to create three independent things to get this done:
- A Connected App
- An Auth. Provider
- A Named Credential
And setting them up was not a trivial process!
These are the steps you should follow if you want to get this working:
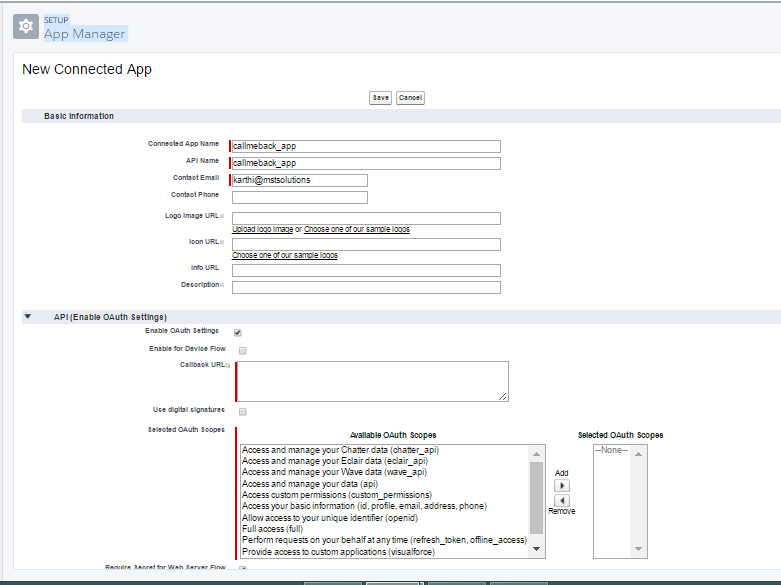
Step #1: 1. Open a browser tab, and create a Connected App like this:

Note: Enter TEMP:VALUE for the Callback URL, we’ll change this in a future step.
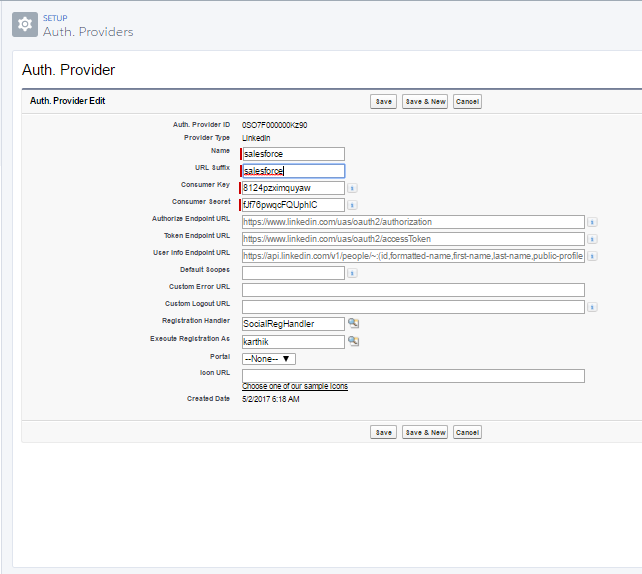
Step#2: Open a second tab, and create an Auth. Provider like this:

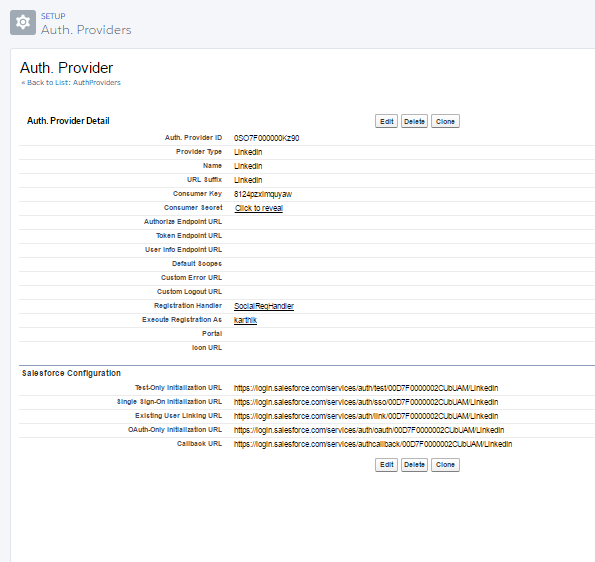
Since you kept the other tab open (I asked you to), copy and paste the Consumer Key and Consumer Secret. For the Default Scopes type “refresh token full”. And click save. You get to this screen:

Copy the Callback URL, and got back to the previous tab (I told you to keep it open) and paste this value into the Callback URL there.
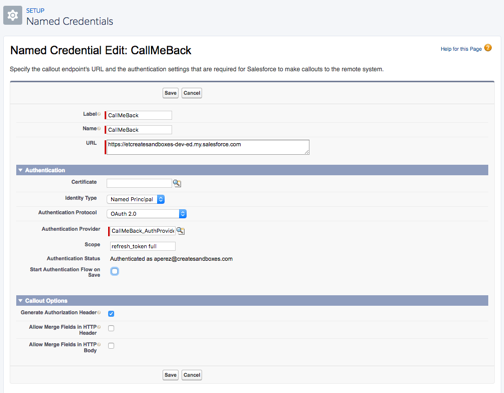
Step #3: Now create a Named Credential like this:

Note: For the URL, enter the URL for your ORG but make sure it’s ***. my.salesforce.com. Then clear the checkbox “Start Authentication Flow on Save” and click save. Click Edit, make sure the checkbox is checked and save again. Why did I not set the checkbox the first time? Because if you make some mistakes saving this you’ll have to restart the form. Believe me it happened to me, and it’s annoying 😉
Step #4: Login to the ORG, and allow the oAuth client.
You are done setting up the Named Credentials, now you can use it by making a small change to your code, like this:
HTTP h = new HTTP();
HTTPRequest req = new HTTPRequest ();
HttpResponse resp = new HttpResponse();
req.setMethod('GET');
req.setEndpoint('callout:CallMeBack/services/data/v39.0');
resp = h.send(req);
System.debug(resp.getBody());
Reference Link: https://developer.salesforce.com/docs/atlas.en-us.lightning.meta/lightning/apex_api_calls.htm


