Introduction:
In this article, we are going to see some advanced features available in Postman which includes creating the postman test scripts, Runner, Monitor, Execution from command prompt and Newman report. If you want to know the basics of Postman, kindly refer the documentation available here.
Installation:
- Download the postman app from https://www.postman.com/downloads/
- Download and install Node.js from https://nodejs.org/en/download/
- Open command prompt & confirm that the node.js is installed successfully in your machine.
You will see the version number in cmd if it is installed successfully.

- Execute following command to install newman: npm install -g newman
- Execute following command to install newman: npm install -g newman-reporter-html
- Confirm that the Newman is installed successfully in your machine. You will see the version number in cmd if it is installed successfully.

Creating First Postman Tests:
- Open postman and create a collection

2. Click New and create a new request inside the newly created collection

3. Mimic the below request
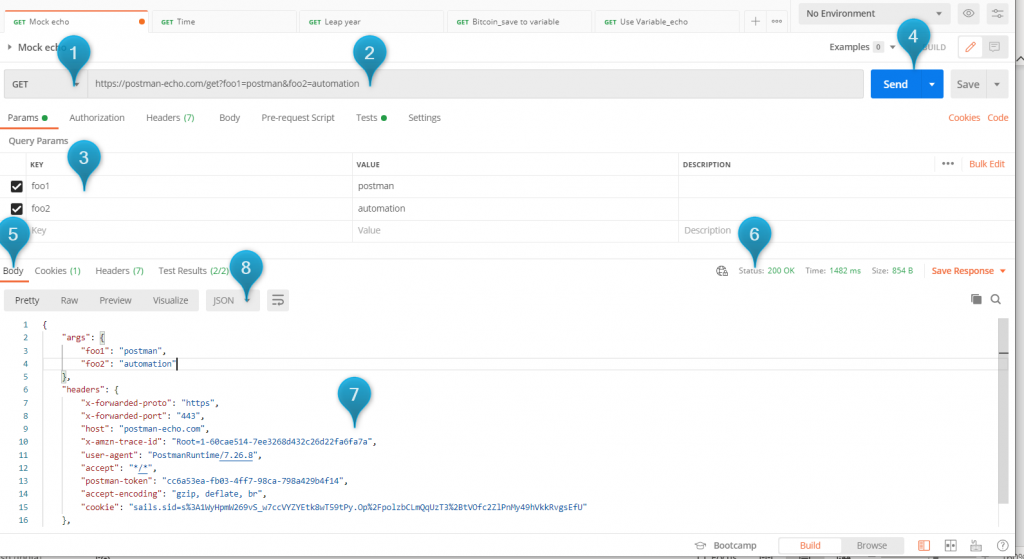
- Methods – Select GET
- Endpoint URL – https://postman-echo.com/get?foo1=postman&foo2=automation
- Parameters – This request uses two params ‘foo1’ and ‘foo2’ where the value can be any. In my example I gave as ‘postman’ and ‘automation’
- Send button – After the above information is feeded, click on Send button to get the result/response.
- Body tab – Where the result/response of that API request will be shown
- Status – Where the HTTP response code of that API request will be shown
- Response body – The actual response body. This sample API uses response which just show the parameter value we just send and couple more info.
- Response type – This sample API uses the response type as JSON.
- Writing the Automation tests
We can write the postman scripts using JavaScript.
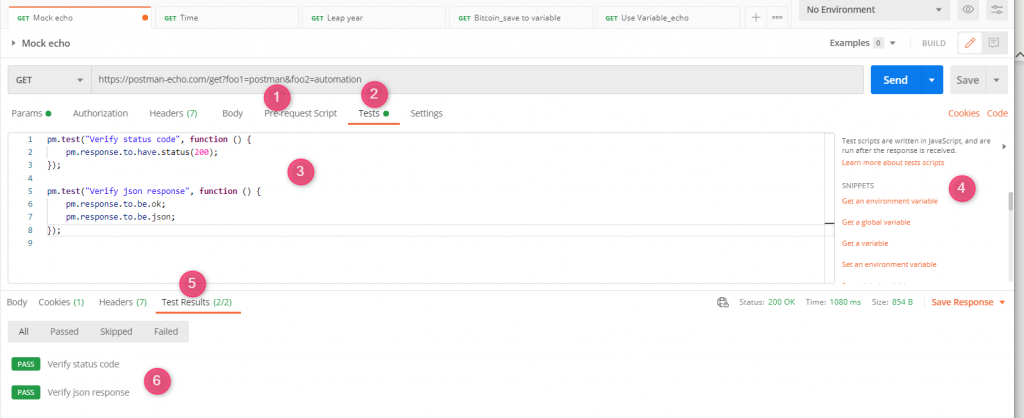
- Pre-request Script – Click on this tab and write the code if there is any pre requisite needed to run your API request
- Tests – This is the actual tab to write all our testcases.
- Test script – In my example, I wrote two tests where the first one tests the response code and the second one tests the json response type.
- Pre definied code snippets – This is the place where we can find lot of pre defined code snippets. On clicking any of the snippet link, the respective predefined code will be automatically copied into our tests.
- Test Results tab – After we get the response, the actual test scripts results will be shown in this tab.
- Test Results – The status of our test scripts.
- Another sample test.
- This request need one parameter which accept any year and results whether the given year is leap year or not.
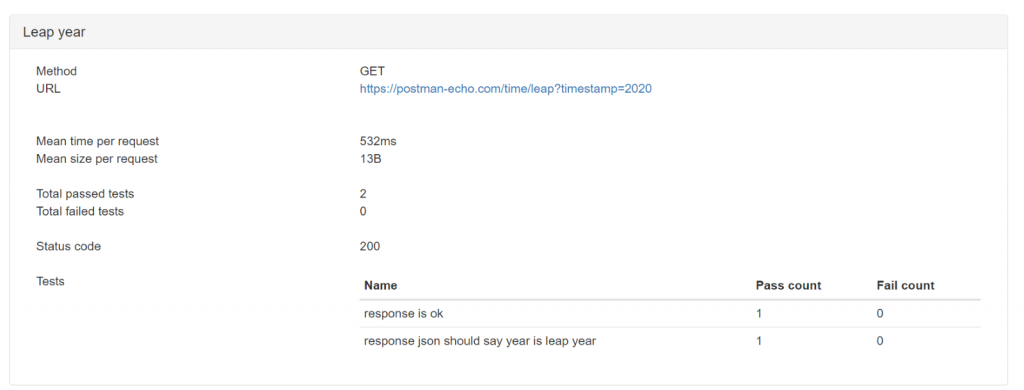
- In this request, we have written two tests. The first test checks whether the response is ok. The second test checks whether the response body ‘leap’ element is true.

- When the year is given as 2020 which is a Leap year

- When the year is given as 2022 which is not a Leap year

Variables
- Supported Postman variable types/scope
- Global – used across workspace
- Collection – used within that specific collection
- Environment – used within specific environment
- Data – came from external JSON or CSV files
- Local – used within the specific request
- Creating variables
- Select the value in the endpoint url which you want to store as variable.
- Click on ‘Set as variable’

- Enter the variable name and define the scope

- After entering the details, Click the ‘Set variable’ button

- In this article, we are going to see more details about global and collection variables.
- Collection variables:
In our previous steps, we saved the collection variable ‘Year’. We can access that variable by clicking the three dots icons in the collection & selecting ‘Edit’

In the ‘Edit collection’ dialog, select the ‘Variables’ tab to access collection variable

Any variable can be used in the endpoint url as follows:

- Global variables
The global and environmental variables will be accessed by clicking the ‘Environment quick look’ eye icon in the top corner.

Store and access variables within test scripts:
The common syntax to set the variable is as follows:


The keyword scope will be replaced with below based on the need:
- Use pm.globals for global variable
- Use pm.collectionVariables for collection variable
- Use pm.environment for colleciton variable
- Use pm.variables for local variable
Sample request:
The below request will return the current bitcoin currency rate.
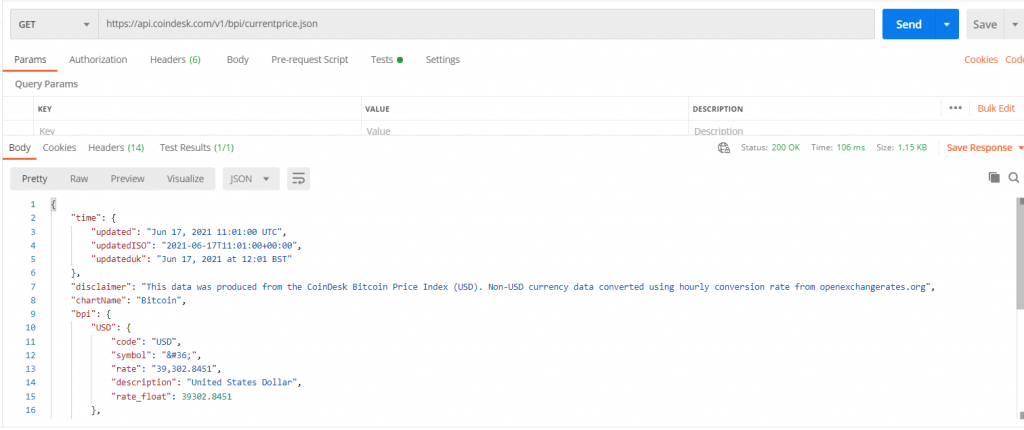
We have written the test to store the USD bitcoin rate (line number 13 in the response) in the global variable. Also, it retrieves the variable and print the value in the console. This also tests whether the Json response has element named ‘chartName’ with the value of ‘Bitcoin’ (line number 8 in the response)
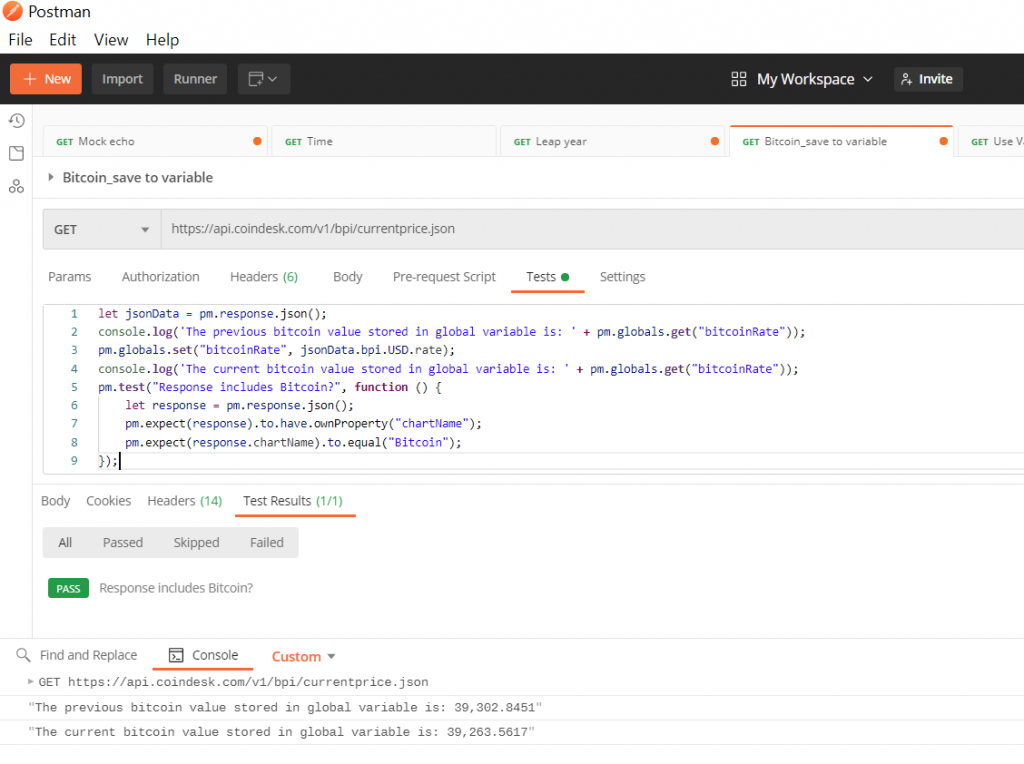
Postman Runner:
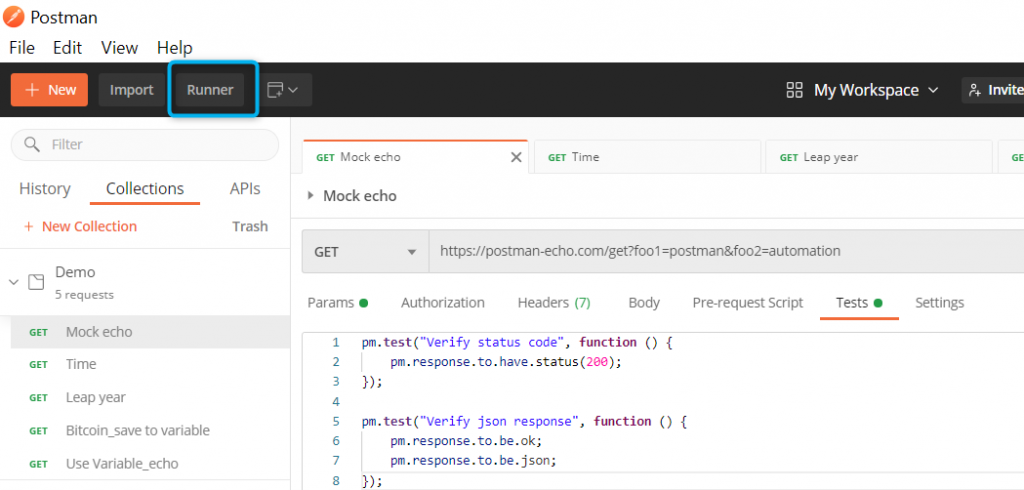
We have created demo collection suite with 5 API requests. Now, lets learn how to run these requests using Postman Runner.
- Once the collection is ready, click the ‘Runner’ button
- You will see another window opening up
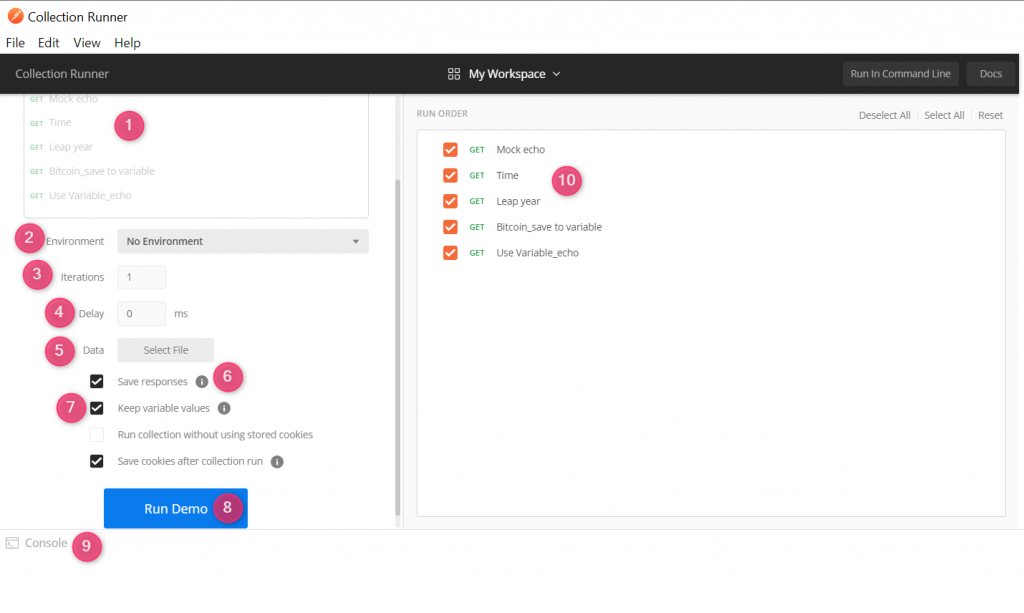
- Select the collection which we are planning to run
- Choose the environment, if you have setup any environment specific requests
- Iteration – The requests will be executed as many times mentioned here
- Delay – If we want to give delay time between each request, we can mention here
- Data – If the collection uses any data sources, then we can use this feature
- Save responses – If enabled, the request header, response body will be stored
- Keep variableiable values – If enabled, write the value of variable at the end of run
- Run – On clicking this button, the actual execution begins
- Console – If there is any errors or any print statements, it will be shown in console
- The requests available in the collection. We can select/deselect the requests which we want to execute in this run.
- Run result
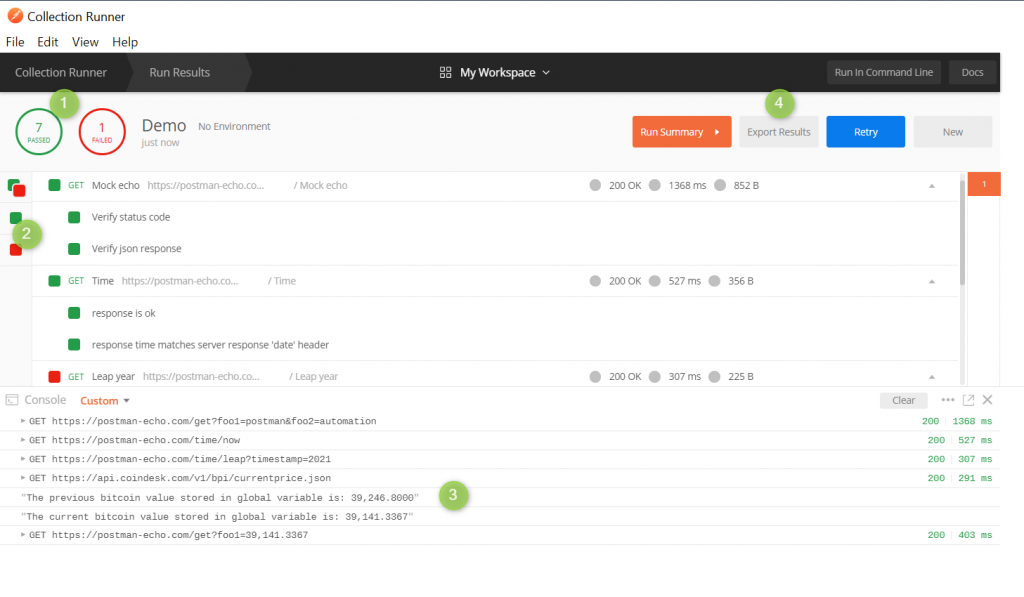
- This summary of the results which show how many are passed and how many are failed
- On clicking the green-red icon, all the tests will be shown. On clicking green icon, only the passed tests will be shown. On clicking red icon, only the failed test will be shown.
- Console output
- Export results into Json file.
- If we want to see more details of the request, by clicking the request name we can view it. As an example, we clicked on ‘Leap year’ request

- Now, click which detail you wanna see. Here, If I want to see response body, just expand it

Postman Monitor
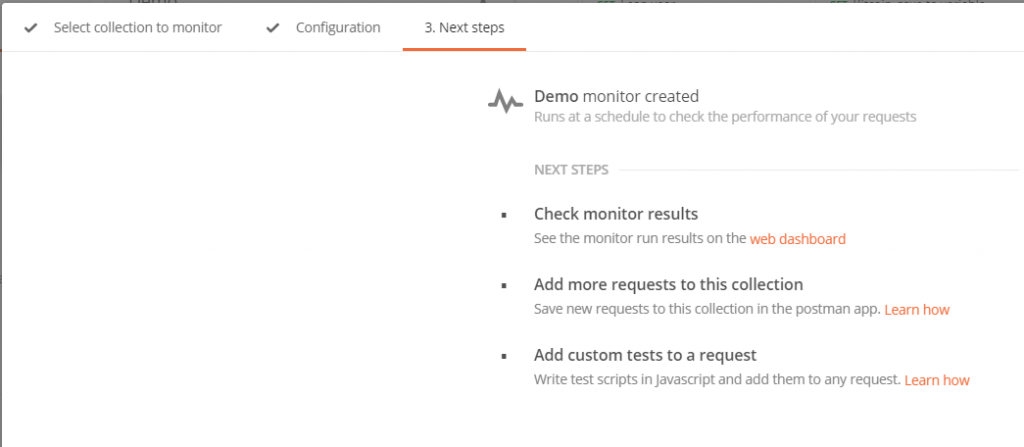
If you want your collection to run periodically (lets say daily), this feature will help you.
- Click the arrow icon located near the collection and select ‘Monitors’ tab > create a monitor

- Select the frequency and click on ‘Create’.
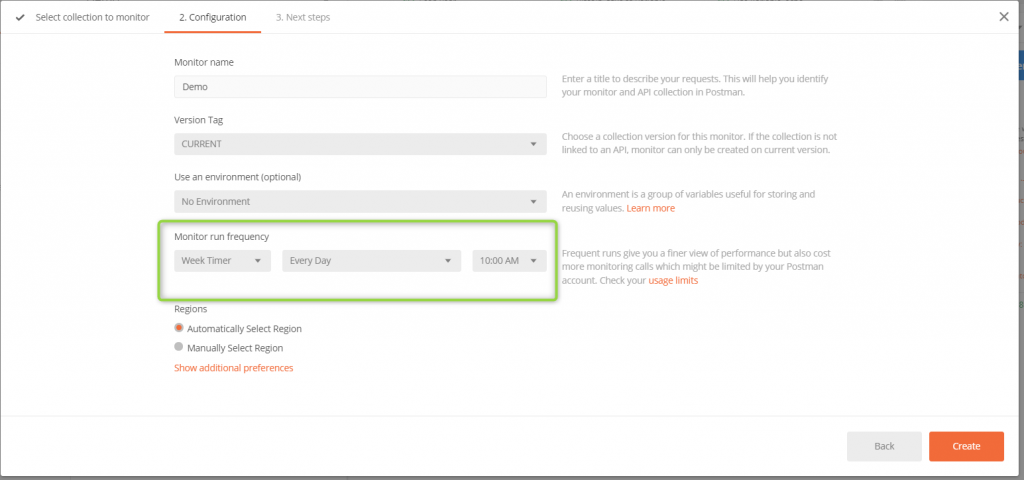
- Copy the web dashboard link and close.
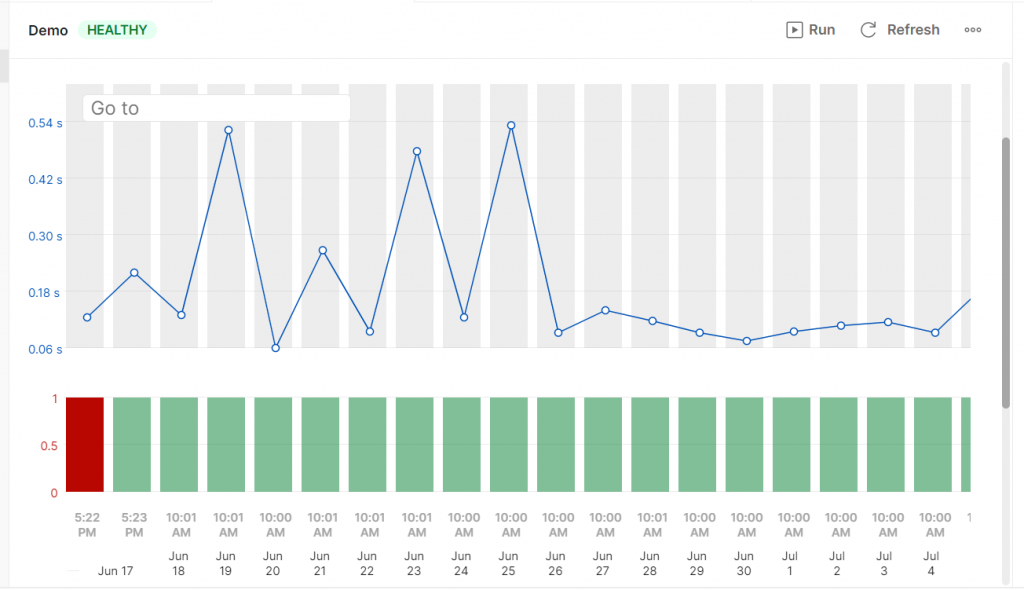
- Use the web dashboard to monitor the results
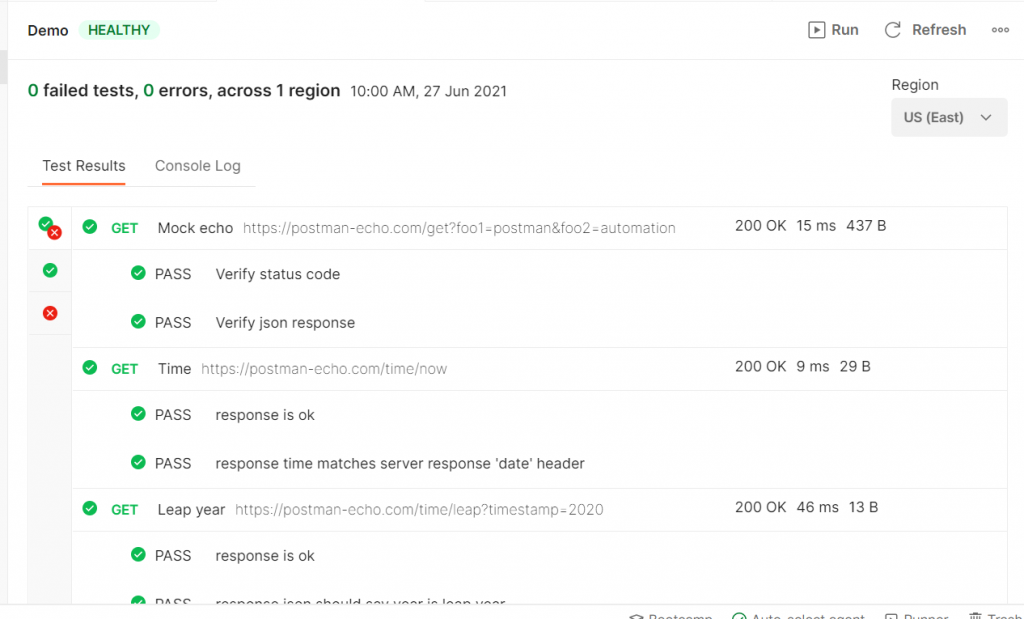
- By clicking any specific day, we can see the detailed report of that specific date run as below
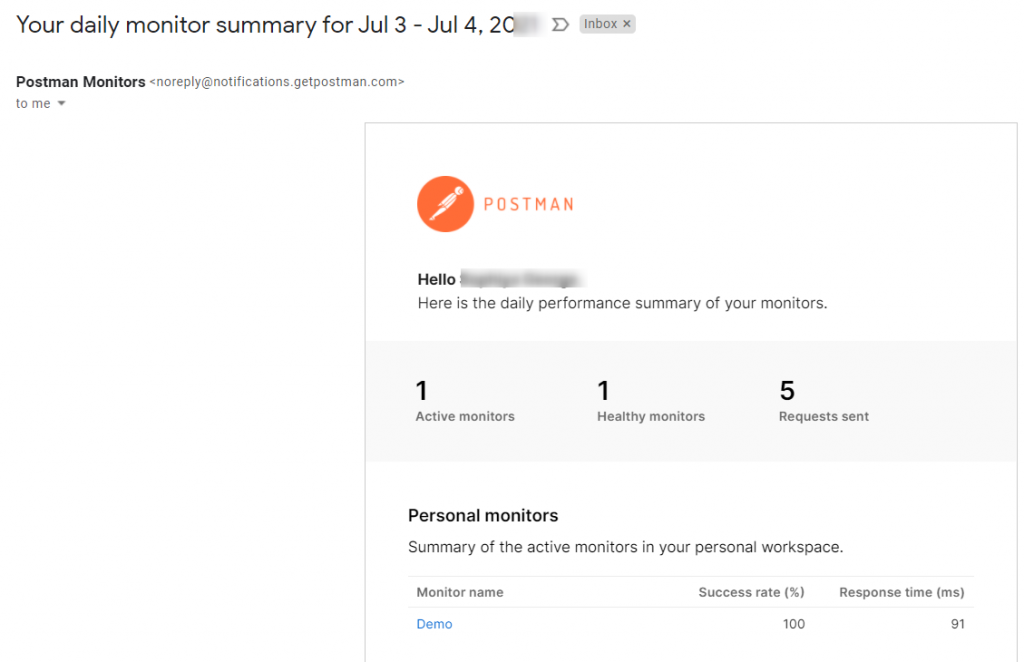
- Same way, an email will be sent to the user after every run
- By using the Monitor, we can setup the smoke suite and monitor the jobs.
Running from command prompt
- Click the three dots in the colleciton and select ‘Export’

- Selection recommended version and click ‘Export’

- Store it as a json file in your local

- Open cmd and navigate to the path where you stored the collection. Run the below command
newman run <collection name>

We can see the response in the console as below


Reports
- In order to store the result as an html report, we need to run below command

- -r denotes reports
- Html denotes the type of report
- After the execution, in the same path a new folder will be created as ‘newman’. In our example, we got the folder in my ‘Desktop’

- Inside that folder, the html report will be availale. Just open the report to see more details
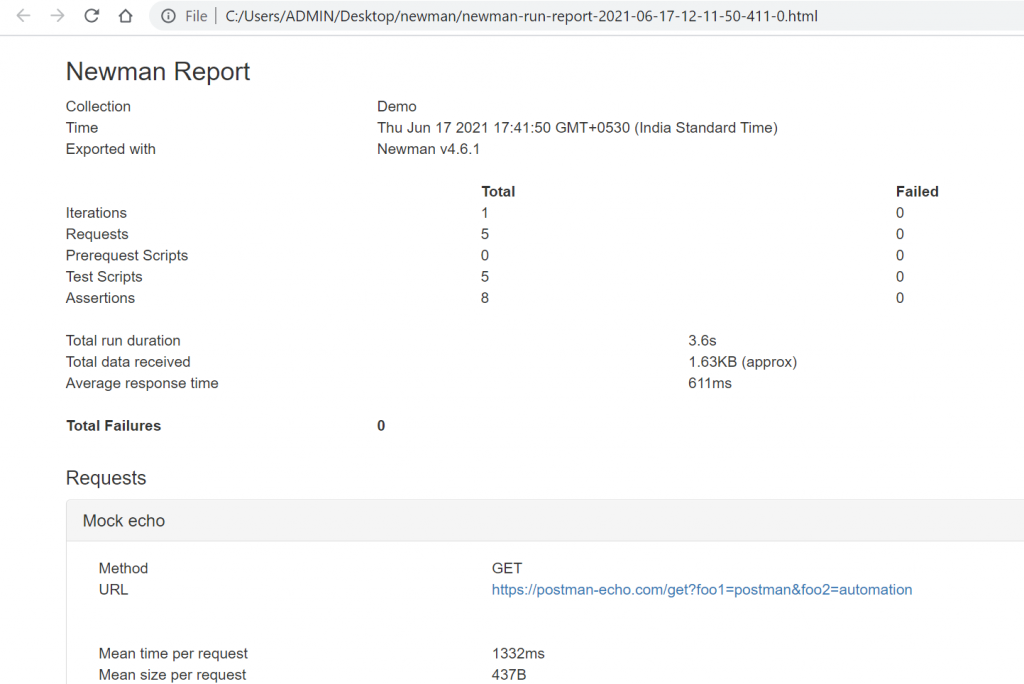
- This report will have the detailed data about each request as below
Conclusion:
We can integrate Postman with CI/CD tools like Jenkins and we can use any code repository like Bitbucket if there is more than one person working or if there is a need to execute the scripts in cloud. If you are interested in integrations kindly refer
https://learning.postman.com/docs/integrations/available-integrations/bitbucket/
https://learning.postman.com/docs/running-collections/using-newman-cli/integration-with-jenkins/


