Outbound Message feature is used to send data from Salesforce to the other systems based on workflow or approval process. SOAP messages can be sent to external systems using this action while integrating Salesforce with other systems. Using PutsReq, which is used to record HTTP requests and fake responses, we can test the Outbound Message. For example, we have configured workflow rule and the outbound message, and we would want to make sure that outbound message is triggered after meeting the workflow evaluation criteria and rule criteria. We can even test format and structure of the message being sent. It is advisable to test the outbound message and what payload has been delivered to the external system.
PutsReq allows us to create a service which will have our outbound message, display request headers, and body, and send salesforce a successful acknowledgment receipt. Other API monitoring tools like RequestBin and Runscope can be used for testing purpose. In case of Request Bin, it cannot return an acknowledgment back to Salesforce on the receipt of the outbound message and Salesforce will keep resending the outbound message for the next 24 hours.
Steps to Configure PutsReq in Outbound Message:
1. PutsReq setup and creating Bucket:
We can setup putsreq bucket as the service and can make use of that as the endpoint URL in the Salesforce outbound message. Below are the necessary steps to be followed:
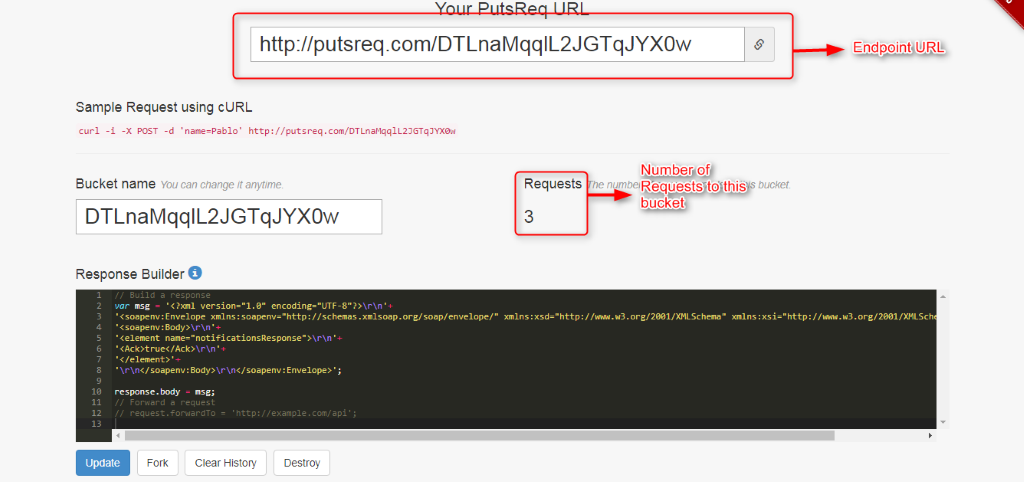
- Navigate to http://putsreq.com and click “Create a PutsReq” button.
- In the response builder, add the SOAP response for the acknowledgement. This is used to make an acknowledgment to Salesforce regarding successful delivery of the outbound message that we send.
- Click the “Update” button to update the response builder.
- Note down the “your PutsReq URL”, which can be used as the Endpoint URL in the outbound message.

Fig. 1: PutsReq setup.
Response Builder code:
Below is the code for the Response Builder to send the response for the corresponding outbound message in JavaScript for PutsReq service to the Salesforce after successfully receiving the outbound message.
var msg;
msg = ‘<soapenv:Envelope xmlns:soapenv=”http://schemas.xmlsoap.org/soap/envelope/”>’;
msg += ‘<soapenv:Body>’;
msg += ‘<notificationsResponse xmlns=”http://soap.sforce.com/2005/09/outbound”>’;
msg += ‘<Ack>true</Ack>’;
msg += ‘</notificationsResponse>’;
msg += ‘</soapenv:Body>’;
msg += ‘</soapenv:Envelope>’;
response.body = msg;
2. Configure the Outbound Message:
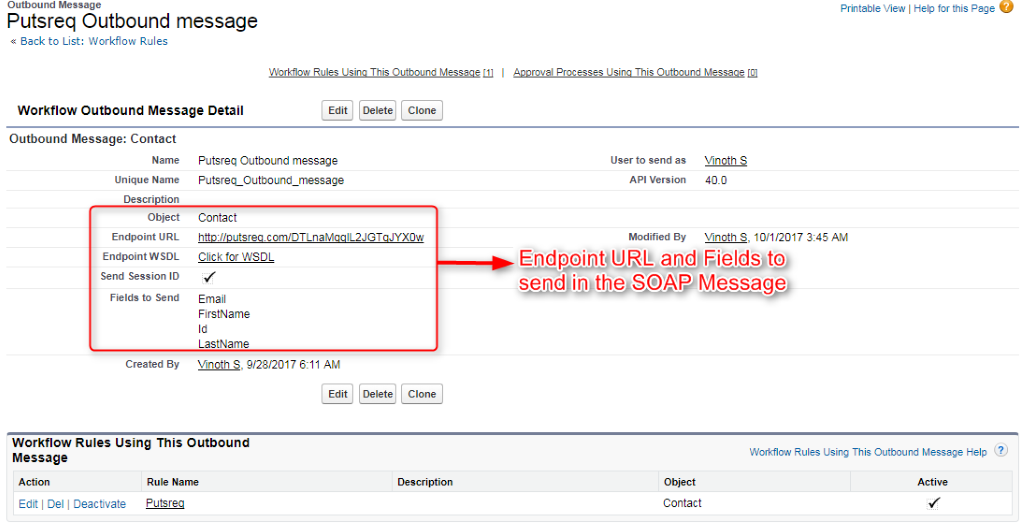
After setting up the putsreq and the URL for the endpoint, we can create Outbound message back in the Salesforce. Create a Workflow that triggers on contact when the first name of the corresponding contact is empty. Once the workflow is created with necessary evaluation criteria and rule criteria, add a new outbound message workflow action. Configure the Outbound Message with the EndPoint URL which is nothing but “Your PutsReq URL” from the PutsReq and add required fields that outbound message should send in the SOAP message.

Fig. 2: Outbound Message Setup with PutsReq URL.
3. Remote Site setting:
After creating workflow with outbound message, remote site setting can be created in order to make a call to an external endpoint.
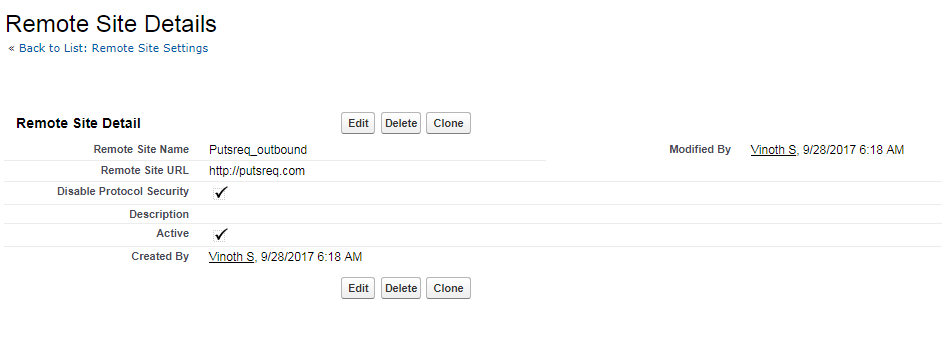
- Navigate to Remote site settings from setup[Symbol]Security Controls.
- Let the Remote Site URL be: http://putsreq.com.
- Check Disable Protocol Security – Since PutsReq is http, and for https it can be unchecked.
- Activate and Save.

Fig. 3: Remote Site setup.
4. Testing in PutsReq:
After setting up PutsReq, workflow with outbound message, and remote site settings we can test outbound message. Create or modify a record by satisfying the workflow rule criteria to trigger the corresponding Outbound Message.
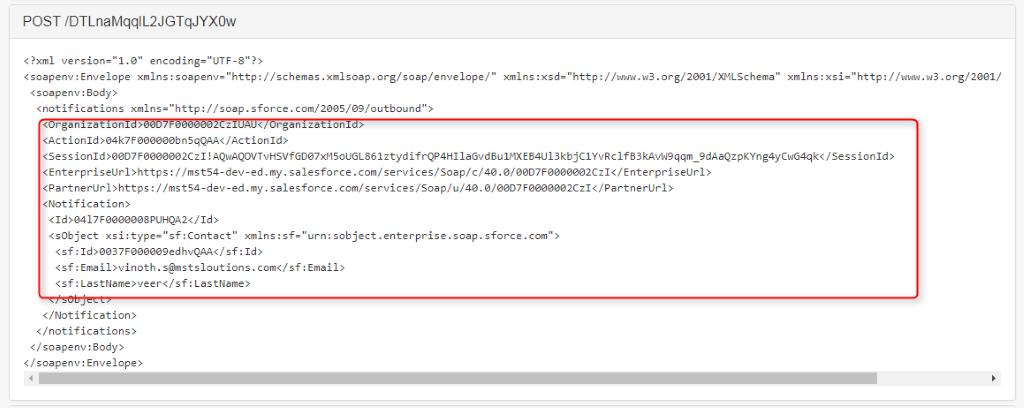
PutsReq will display request headers, request body, and the response body which the PutsReq sent back to Salesforce as a response.

Fig. 4: Outbound Message sent to PutsReq.
Above Fig 4 shows the outbound message sent from the Salesforce to the external system, by using putsreq which used to record fake responses from Salesforce. In the above outbound message it contains organization Id, session Id, Enterprise URL, record ID, and the fields which mentioned in the outbound message setup.

Fig. 5: Response sent to the Salesforce as an acknowledgement.
In the above Fig. 5, it shows the response sent back to the Salesforce after receiving Outbound Message successfully. This response code can be explicitly added in the Response builder as mentioned in the Step 1: setting up PutsReq and creating bucket.
Considerations:
- If the putsreq endpoint is unavailable, messages will stay in the queue.
- Acknowledgement is sent to the Salesforce to avoid repetition in sending the same message.
- When the messages aren’t delivered, it retries to send independent of their order in queue.
Benefits:
- Response is sent to the Salesforce after receiving outbound message successfully
- Only one acknowledgement is sent for the bulk update.
- Ease of access to the information from the outbound message.
Reference:


