Single Sign-On (SSO) is an authentication type that allows users to log in with a single username and password to any of several related, independent software systems. It allows you to validate usernames and passwords against your centralized database or other client application rather than having separate user passwords managed by Salesforce.
Benefits of SSO:
- Reduced Administrative cost
- One identity for all applications
- Increased security
- Ease of use
- Timesaving
Single sign-on compatibility:
Applications can connect using standard modern authentications protocols – SAML or OpenID Connect. One of the most attractive advantages of using Azure AD is its ability to enable single sign-on, and it supports third-party application integration to help achieve this.
SAML:
XML is used for identifying data format and simple HTTP or SOAP that is used for data transport mechanisms. Relying Party (RP) service involves data requesting and receiving from the IdP. The SAML Assertion, in the form of attributes (e.g., email address, name, phone), is transferred to service providers (SP) such as Salesforce, G Suit, etc. It is the user identity data encapsulated in an XML document.
SAML can provide a mechanism for federated identity.
What is Azure AD:
- Azure Active Directory is Microsoft’s multi-tenant, cloud-based identity provider and access management service.
- Employees get to access external resources held in Office 365 along with an ever-growing list of other SaaS applications, either on the corporate network or intranet.
- Both on-premises and cloud-based users get the same apps and resources that enables features such as single sign-on (SSO), conditional access, multi-factor authentication (MFA) and more.
Why Azure AD:
Azure AD incorporates comprehensive identity management capabilities, including multi-factor authentication, device registration, self-service password management, auditing, security monitoring, and alerting.
- Integration with an existing windows server active directory.
- Pre-integration with favourite cloud services such as salesforce, Office 365, corporate social media.
- Azure AD multi-factor authentication and conditional access create improved application security with full management control.
Using Azure AD SSO with Salesforce:
The everyday use case for SSO in Salesforce is to maintain the single user credentials for the same network of applications or third-party applications. When a user has outlook login credentials, then by using SSO, we can integrate that user credentials from Azure AD to Salesforce with the help of SAML requests and Just-in-time user provisioning. This integration saves the user’s registration process time, improve user experience and security as well.
Prerequisites for integrating Azure AD with Salesforce:
- If you do not have an Azure AD subscription Account, you need to create an account using below link,
https://azure.microsoft.com/en-in/free/
- Salesforce single sign-on (SSO) should be enabled in your account.
Azure AD Application Registration:
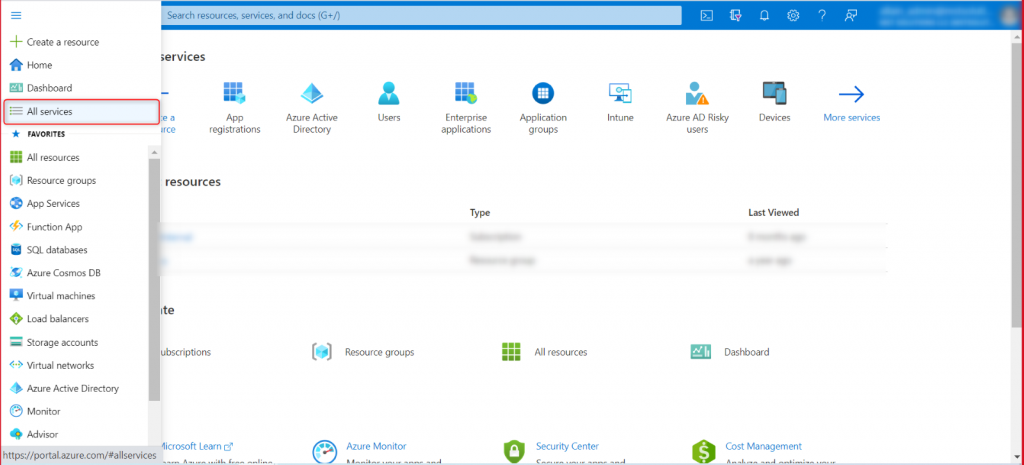
Step 1: Click All Services as shown in the image below.

Step 2: Click Active Directory as shown in the image below.

Step 3: Click Enterprise Applications as shown in the image below.

Step 4: Create a new application (Need Admin Access) following the below images.


(Select “Salesforce” when you do this configuration for Production Org)

(Select ‘Add’ button to create Application)

Now, you have successfully created the Azure AD Application.
Step 5: Now, you must setup Single sign on configuration for the created azure ad application.

In single sign on set up, you must configure three sections.
- Basic SAML Configuration
- User Attributes & Claims
- SAML Signing Certificate
Basic SAML Configuration:
- Identifier (Entity ID) – Need to provide the Salesforce community portal URL
- Reply URL (Assertion Consumer Service URL) – Need to provide the Salesforce community portal URL
- Sign-on URL – Need to provide the single sign-on page URL
- Relay State – Need to provide the single sign-on page URL
- Logout URL – Need to provide the Salesforce community portal URL
User Attributes & Claims:
In this section, you must select the attributes you need from Azure AD to your Salesforce.
SAML Signing Certificate:
Once you are done with the above configuration, you must download the federation metadata XML file in this section.
Step 6: Now, you must add test user to the Azure Ad application; so that, you can test with this user credentials.
To add user, follow the below image.

Salesforce SAML Single Sign-On Setup:
The following steps are written for Lightning Experience.
Step 1: Setup -> Identity -> Single Sign-On Settings (Enable SAML, if not enabled already)
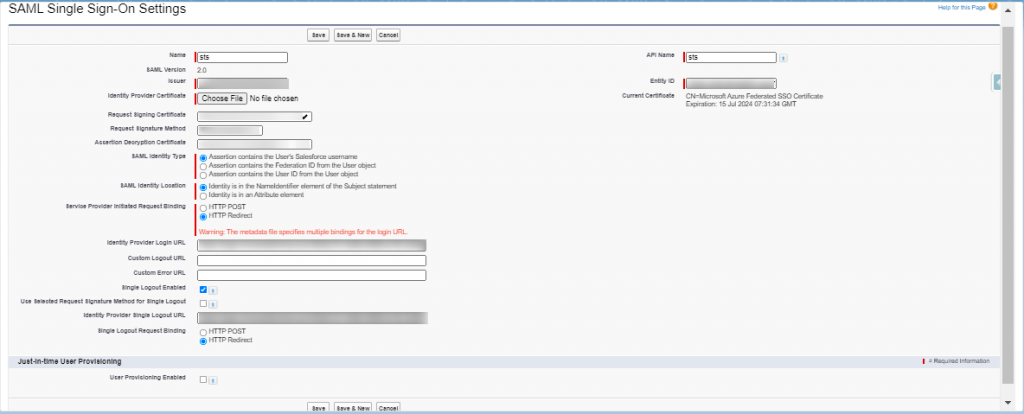
Step 2: Setup ->Identity -> Single Sign-On Settings -> SAML Single Sign-On Settings -> New from Metadata File, then upload the federation metadata XML file which you have downloaded in the step 5 SAML signing certificate section.

- Name: Community SSO
- API Name: Community_SSO
- Issuer: This will be automatically prepopulated from federation metadata XML file
- Entity ID: This will be automatically prepopulated from federation metadata XML file [Make sure the same in Azure Basic SAML Configuration]
- Identity Provider Certificate: This will be automatically prepopulated from federation metadata XML file
- Request Signature Method: RSA-SHA256
- Assertion Decryption Certificate: Assertion not encrypted
- SAML Identity Type: Federation ID
- SAML Identity Location: Subject
- Service Provider Initiated Request Binding: HTTP Redirect
- Identity Provider Login URL: This will be automatically prepopulated from federation metadata XML file
- Identity Provider Logout URL: This will be automatically prepopulated from federation metadata XML file
- User Provisioning Enabled: Enable
- User Provisioning Type: Custom SAML JIT with Apex handler
- SAML JIT Handler: JITHandler
- Execute Handler As: System Admin [Current User]
Step 3:
- Click Setup -> All Communities -> Select Your Community -> Workspace -> Administration.
- Login & registration tab ->Login page Setup -> In sign in option section, Select the Custom App which is created in Single Sign-on Setup (Community SSO).

Validate:
- Setup ->Identity -> Single Sign-On Settings -> SAML Single Sign-On Settings ->Select your SSO Name (Community SSO)-> Endpoints->For Communities-> Copy your community Login URL.
- Paste the URL in the address bar
- The URL will redirect to the outlook login page
- After successful log in using outlook login credentials, the user will be landed in the Salesforce Community.
For Community (License-Salesforce Platform) User, Account and Contact Creation SAML JIT Handler:
- Jit Handler Class is almost same for both Okta and Azure AD; so, please refer the below link
Summary:
Single Sign-On using Azure AD is useful and a secured way of managing the users in a central location called azure portal. Enable your users to be automatically signed-in to Salesforce with their Azure AD Account.


