Are you going to work with APIs to make simple or complex HTTP requests? Do you need to test the request and response of Salesforce Web Service calls in an easy and straightforward way?
The solution is POSTMAN REST client. Postman helps you be extremely efficient, while working with APIs. It is a HTTP client to test Web services easily and efficiently. The Web Service calls are tested through an UI, by filling in input data via Postman. It also helps automate the process of making API requests and testing API responses in a very efficient manner.
Why QAs/Testers are using Postman for Web Service Testing?
- Easy to trigger the events – It’s an Add-on on browser to trigger the events from out-side of the applications.
- Easily accessible interface – The key feature of Postman is ease of use–just with one click. It automates the testing process by using the interface alone.
- Collections – It’s used to save the API call request with input data for future uses. It can be shared with team members or others who are going to use the same API calls in the future.
- History maintenance – Saves our time by storing previous API calls in its history, eliminating the need to re-enter the API call details.
Scenario to test:
Let’s assume that we have an Account in Salesforce. A new task should be created for that Account with the following details, when a call is made to the Web Service:
- Subject : Account Creation
- Comments : Follow-up for Course Offerings
- Due Date : 2 days
- Assigned To : Manager (Manager of the account)
The Webservice will be called, when the below criteria are satisfied:
- Rec_Type : Site
- Priority : 3
Here, we are going to use POSTMAN Rest Client app to test the below two scenarios:
Scenario: 1
Test by giving the input as
- Rec_Type : Site
- Priority : 3
Scenario: 2
- Rec_Type : Site
- Priority : less than 2
Before starting the test, it’s important to set up the POSTMAN Rest client app in our system. Let’s see how to set up the POSTMAN Rest Client.
Setting up Postman
- Install Postman – Rest Client Add-on
It’s an Add-on available for Chrome. We may need to use any Gmail account to proceed with that.
- Go to Chrome Webstore –> Search for ‘Postman Rest client’ –> Add it to your browser

- Generate Access Token

Various components involved in sending HTTP(s) request to generate the Access Token.
- Base HTTP Request URL
- Method of request
- “URL params” to split the URL into pairs automatically
- Headers are used to send any string as the header name
Base HTTP request URL:
There are two ways to generate the Access Token:
- Enter the following key/pair values in the “URL params” section on the UI, if the Base URL value is https://login.salesforce.com/services/oauth2/token
- Construct the complete URL (Base URL + parameters) in the following way that contains key value pairs.

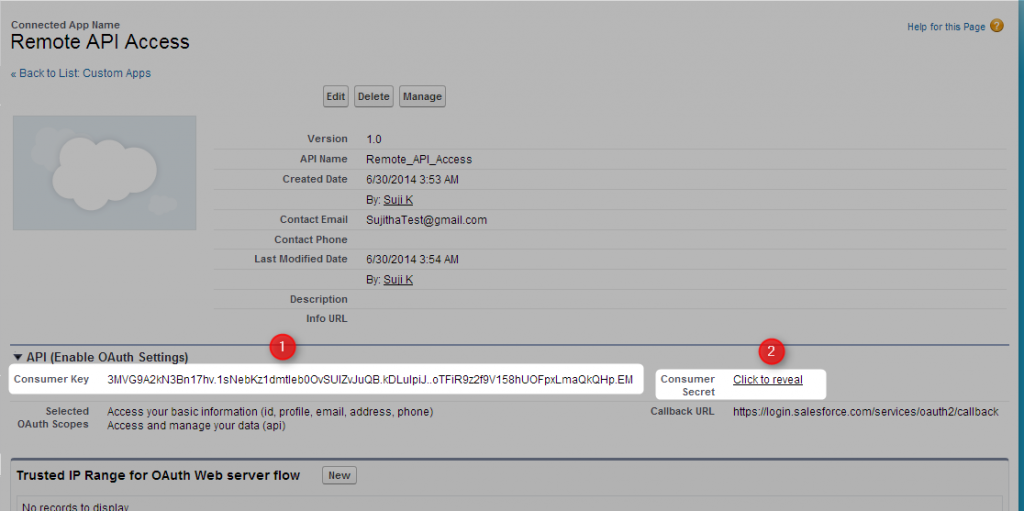
Here, the “Client id” & “Client Secret” values are from Salesforce. We can get these values from Salesforce’s Remote Access: Setup -> Develop -> Remote Access ->Take Me There -> Connected Apps

The Consumer Key (Client Id), and Consumer Secret (Client Secret) are used by Rest Client to get the Access Token from Salesforce. Once the Access Token is obtained from Salesforce, the Rest Client will pass this token to Salesforce in its subsequent Webservice calls.

To send the HTTP request and get the response from Salesforce, we have to authenticate the Salesforce User account used by Rest Client, by sending this access token as a parameter value in Headers.
Add Access Token to Collection
We can store the access token into collections for future use also. Click the ‘Add to collection’ button.

It will ask us to fill in name for the collection. Click the ‘Add to collection’ button, once you have filled in the values for the other fields.

Then, it will store the access token under the Collections, as below. We can make use of it for future uses.

Send Request
To send the request via postman we have to set the below values:
- Authorization as ‘OAuth <Access Token>’
- Content_Type as ‘application/json’
- Click ‘raw’ tab.
- Select the value from the picklist near to raw button. We can pick any value depending on the type of request/ response we are going to handle. Here, we are going to send the request type as JSON type and get back the response as the same type.

Scenario: 1
Paste the request and click ‘Send’ button.

The request will be sent to Salesforce and it will fetch the results from Salesforce.
(We can cancel the request before it returns the response, by clicking ‘Cancel Request’ button.)

Receive Response in Postman Response Viewer
It will return ‘true’ and Status as ‘200 OK’ , if the request is successful; otherwise it will return an error message.

Verify the Result in Salesforce
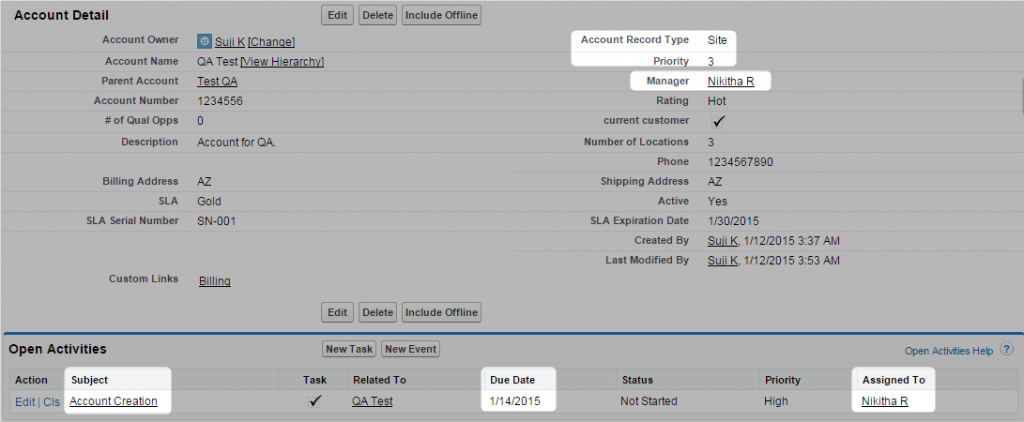
Login to Salesforce and verify the Task is successfully created in Salesforce Account.

The task is created with expected Subject, Comments, Due Date, and Assigned To.

Scenario: 2
Here we have changed the input value for Priority field in request to test the negative scenario and click ‘Save’ button.

Receive Response in Postman Response Viewer

Verify the Result in Salesforce
No task has been created for this account, as expected.

In a similar way, we can test different scenarios by directly changing the input values in request via POSTMAN.
API Call Request History
The REST Client stores all prior API calls sent using POSTMAN app. We can easily load the prior API calls into the response viewer, by clicking the API calls from the History list.

Please refer POST MAN REST Client for Chrome for more details about POSTMAN REST Client.


