Introduction about Web Service Testing
Web Service Testing is one of the functional testing areas to test a specific application using different protocols. Generally, SOAP and REST are the two important protocols used to deliver the message and communicate with different systems with security.
Test Web Services with SOAP protocol
Generally, SOAP protocol includes WSDL file in the XML format to send and receive the web service requests and responses. WSDL file describes the operation to perform offered by a web service. To test each operation, we can supply input values for the webservice and the output response can be generated.
Suppose if we need to test a Salesforce client application to which we have no direct access to create the records. With the help of SOAP UI tool, we can pass the message or we can create communication over the client application. Before start testing the application, we need to integrate the Salesforce application with the SOAP UI tool.
How to Integrate Salesforce with SOAP UI tool:
As a client-side system admin, you can generate the WSDL by following these steps:
1.Click Set up and enter the API in the Quick Find box.
2.Click Generate Enterprise WSDL in API WSDL Page.
3.Click Generate button in Generate Enterprise WSDL page.
4.Once the File is generated in the XML format, right click the page and save it in the local drive.
5.Open the SOAP UI Tool.
6. Click New Project and paste the XML file in initial WSDL column.
7.Click ok Button.
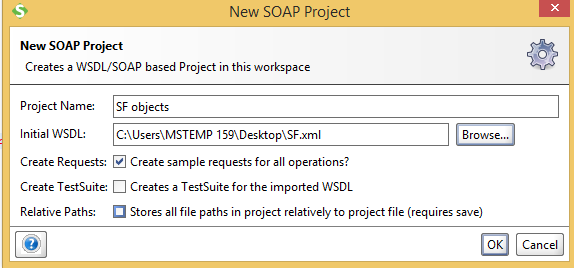
In the left-hand side, SF Objects project appears to perform several actions.

We need to send the login request by exploring the login button. Then, press the “Request1”. In the request, we will replace the “?” with values for username and password lines.

Once the request is sent, the output is generated in the right-hand side window. Here, we need to capture the session id and server URL.
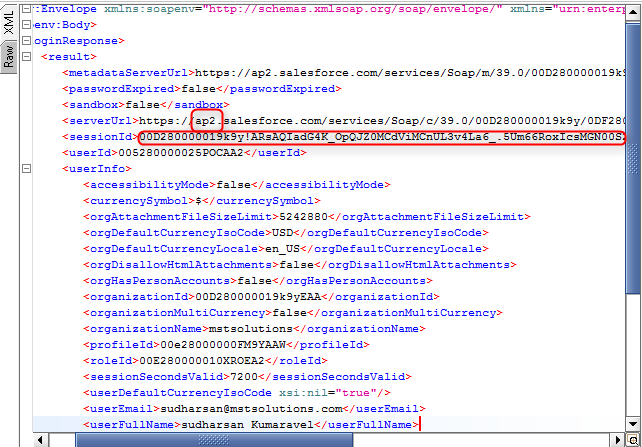
Scenario 1: To test a single Salesforce records for a single object using create () API
To send the create request for a single record, please copy and paste the below xml script into the left-hand side window.
XML script:
 <soapenv:Envelope xmlns:soapenv="http://schemas.xmlsoap.org/soap/envelope/" xmlns:urn="urn:enterprise.soap.sforce.com" xmlns:urn1="urn:sobject.enterprise.soap.sforce.com" xmlns:xsi="http://www.w3.org/2001/XMLSchema-instance">

  <soapenv:Header>

    <urn:SessionHeader>

      <urn:sessionId>Enter the session id </urn:sessionId>

    </urn:SessionHeader>

  </soapenv:Header>

  <soapenv:Body>

    <urn:create>

      <urn:sObjects xsi:type="urn1:Enter the object name/API Name">

        <Enter the Field Name/API Name>enter the value </ Enter the Field Name/API Name >

      </urn:sObjects>

    </urn:create>

  </soapenv:Body>

</soapenv:Envelope>
Test steps for the above scripts:
1.Replace the session id by sending the login request.
2.Replace the “Enter the object name/API Name” with the object name for standard object. For custom objects, please enter the API name of the object.
3.Replace the “Enter the Field Name/API Name” with the field name for standard fields. For custom fields, please enter the API name of the field.
Scenario 2: To test multiple Salesforce records for two different objects using the create () API
To send the create request for multiple records for two different objects, please copy and paste the below XML script into the left-hand side window.
<soapenv:Envelope xmlns:soapenv="http://schemas.xmlsoap.org/soap/envelope/" xmlns:urn="urn:enterprise.soap.sforce.com" xmlns:urn1="urn:sobject.enterprise.soap.sforce.com" xmlns:xsi="http://www.w3.org/2001/XMLSchema-instance">

  <soapenv:Header>

    <urn:SessionHeader>

      <urn:sessionId>Enter the session id</urn:sessionId>

    </urn:SessionHeader>

  </soapenv:Header>

  <soapenv:Body>

    <urn:create>

      <urn:sObjects xsi:type="urn1: Enter the first object name/API Name ">

        <Name>?</Name>

        <department__c>?</department__C>

        <date_of_joining>?</date_of_joining>

        <test_checkbox__c>? </test_checkbox__c>

        <Test_Lookup__c>?</Test_Lookup__c>

      </urn:sObjects>

      <urn:sObjects xsi:type="urn1: Enter the second object name/API Name ">

        <FirstName>?</FirstName>

        <LastName>? </LastName>

      </urn:sObjects>

    </urn:create>

  </soapenv:Body>

</soapenv:Envelope>
Test steps:
1.Replace the session id by sending the login request.
2.Replace the “Enter the first object name/API Name” with the object name for standard object. For custom objects, please enter the API name of the object.
3.For checkbox field, pass the Boolean value — either ‘1’,’True’ (or) ‘0’,’False’.
4.For date field and date/time field, please follow the either one of the below format.
| Format | Format Syntax | Example |
| Date only | YYYY-MM-DD | 1999-01-01 |
| Date, time, and time zone offset | YYYY-MM-DDThh:mm:ss+hh:mmYYYY-MM-DDThh:mm:ss-hh:mmYYYY-MM-DDThh:mm:ssZ | 1999-01-01T23:01:01+01:001999-01-01T23:01:01-08:001999-01-01T23:01:01Z |
5.For picklist field, you can pass the active values as well as inactive values. If we want to restrict the inactive values, then we can change the Salesforce configuration to restrict picklist to the values defined in the value set.
6.For Lookup field, we need to create records for child to parent relationship. So, we need to pass the value as “Record id” of the parent.
6. Similarly, we can add the second object and field name by replace the “< Enter the second object name/API Name “> in the script.
7. Click the Request button.
8.Verify the success message in the right-hand side pane for the creation of records.
Below, I have provided the sample request to pass to the integrated Salesforce account.
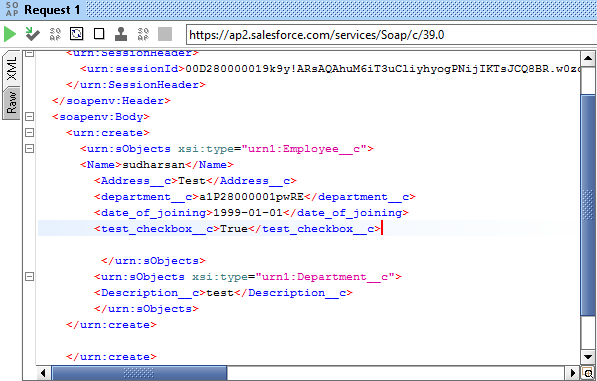
Once the request is passed, we get an immediate response from the integrated salesforce account.

How to save the request in the test case:
1.Click the “Add this request to a test case button”
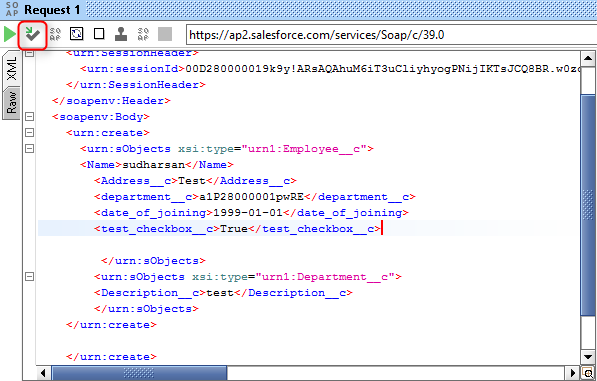
2.Choose the Test suite based upon the action we need to test (we can create new suite as well we can also add the test steps in the existing test suite)
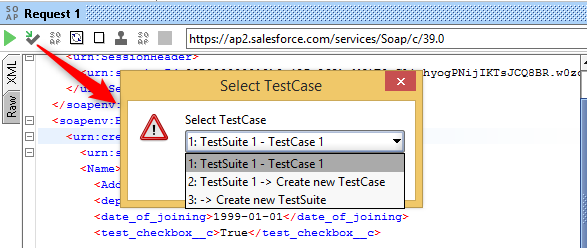
3.Let us create a new test suite named “Test suite-2”
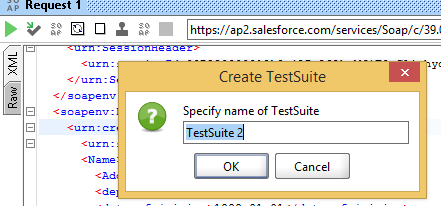
4.Then, create a test case number to perform the actions wherever necessary

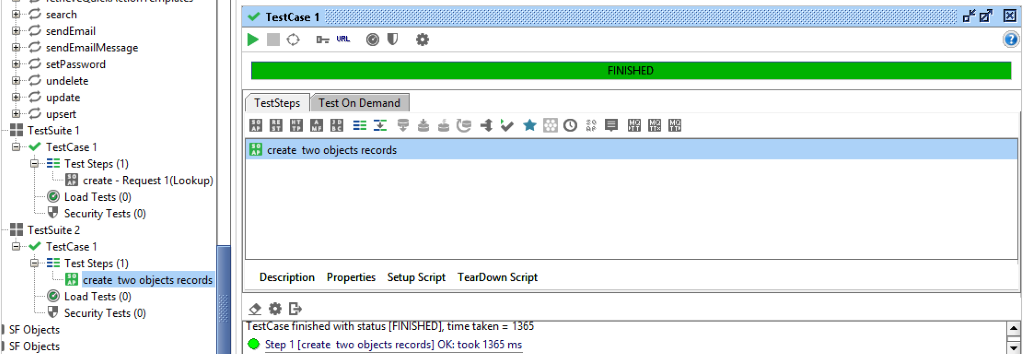
5.Finally, add the name of the Request to the test case

6.Execute the test case in the Test Suite-2 named “Create two object records”
Scenario 3: How to test by Querying the records using the query () API.
Sometimes, we come across business requirements for querying records from child-to-parent relationship objects. Let’s assume that the Department and Employee would be the parent and child objects available in the Salesforce account. So, I need to query child to parent relationship records. e.g. employee name, employee salary, department name, department description but records should be read only for IT department.
In the SOAP UI tool, please copy and paste the below xml script:
<soapenv:Envelope xmlns:soapenv="http://schemas.xmlsoap.org/soap/envelope/" xmlns:urn="urn:enterprise.soap.sforce.com" xmlns:urn1="urn:sobject.enterprise.soap.sforce.com" xmlns:xsi="http://www.w3.org/2001/XMLSchema-instance">

  <soapenv:Header>

    <urn:SessionHeader>

      <urn:sessionId>Enter the session id </urn:sessionId>

    </urn:SessionHeader>

  </soapenv:Header>

  <soapenv:Body>

    <urn:query>

      <urn:queryString>Enter the Query here </urn:queryString>

    </urn:query>

  </soapenv:Body>

</soapenv:Envelope>
Test Steps:
1.Add the test steps to the test suite for query request.

2.Enter the query into the query response.
“select Name, Salary__c, Department__r. Name,Department__r.Description__c from Employee__c “

3.The output response shows the records with employee name, employee salary, department name, department description for IT department only.

Conclusion:
With the help of SOAP UI tool, we can integrate client applications with salesforce to send the request for various API calls like insert, delete, update, upsert, query operations and manage each test cases with the help of test suite folder.
Reference Links:


