Salesforce Authenticator App
Salesforce Authenticator is an intelligent, mobile-enabled two-factor authentication app that adds an extra layer of security to protect the Salesforce account and data. The app delivers enterprise-class security, while providing simplicity and convenience for the end users.
Two Factor Authentication
Two-factor authentication is a great way to keep the online accounts and data secure. Two-factor authentication means that there are two things, or two factors to access the account and data.
Factor 1: The first factor is something we know, like our username and password combination.
Factor 2: The second is something we have, like a mobile device with a security app installed.
This article deals with the second factor (The mobile device with a security app) and its important features such as,
- Enable Two Factor Authentication for users
- Download and connect with Salesforce Authenticator Mobile App
- Account Activity Details
- Automate Two Factor Authentication from trusted locations
- Block unrecognized account activity
- Remove an account from Salesforce Authenticator
- Backup your connected accounts in Salesforce Authenticator App
- Enabling Two Factor Authentication(2FA)for Salesforce Users
Two-factor authentication can be setup for existing users, new users and by user profiles.
Two ways to enable it to the users,
Method I: Salesforce Org Admin can enable it to the user using a Permission Set.
Method II: Enable 2FA through App registration from the personal settings.
Method I: As a Salesforce Admin, enable 2FA to a new user
Step 1: Set the session security level for two-factor authentication
For any admin user, it is important to do this step before setting up a 2FA requirement. Otherwise, you could prevent yourself or other admins from logging in.
I. Go to setup –> Quick Find –> Session Settings
II. Under Session Security Levels,make sure that two-factor authentication is in the High Assurance Category.
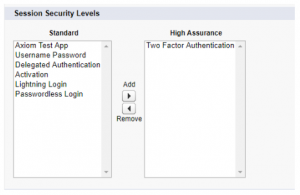
Step 2: Create a new user in Salesforce
I. Go to setup –>Quick Find –> Users
II. Enter values for all the mandatory fields –> Click save (For this article, “Sarah Susan” is the user created)
Step 3: Create a permission set for two-factor authentication
I.Go to setup –> Quick Find –> Permission set –> New –> Enter a label name –> Click save
II. Under System –> Click System permissions
III. Click Edit –> Select Two-Factor Authentication for User Interface Logins –> Click save

![]()
Step 4: Assign the permission set to Sarah’s account
I. On the detail page of the new permission set, click Manage Assignments –> Click Add Assignments.
II. On the list of users, select the checkbox next to Sarah’s account –> Click Assign
Method II: Enable 2FA through App registration from the personal settings.
I. Navigateto My settings –> Quick Find –> Advanced User Details
II. FindApp Registration: Salesforce Authenticator –> Click Connect


2.Download and Connect the Salesforce Authenticator App
Download and install version 3 or later of the Salesforce Authenticator App for the type of mobile device you use (iPhone / Android)
2.1 Connect the App to the User Account
Phone: After installation, tap the icon to open the Salesforce Authenticator.
Browser: Use Sarah’s username and password to log in.
Browser: Salesforce prompts you to connect Salesforce Authenticator to Sarah’s account.
Phone: Tap the arrow to add Sarah’s account to Salesforce Authenticator. The app displays a two-word phrase.
Browser: Enter the phrase in the two-word phrase field –> Click Connect.
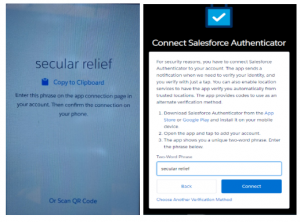
Phone: Salesforce Authenticator shows the details about the account you are connecting –> Tap Connect.
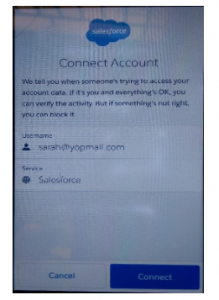
Browser: Hurray!! Salesforce Authenticator App is connected to her user account and Sarah’s in.
Next time, when Sarah or someone logs in to Sarah’s account, she gets notification on the phone. She opens the app and checks the activity details.
2.2 List of activity details displayed in the Salesforce Authenticator App
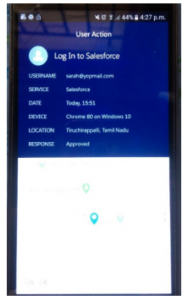
- Action:The action that Salesforce Authenticator is verifying – In this case, login action.
- User:The user who’s trying to log in.
- Service:The service the user is attempting to access – In this case, Salesforce.
- Device:The device or browser that the login attempt is taking place on.
- Location:Displays the phone’s current location.
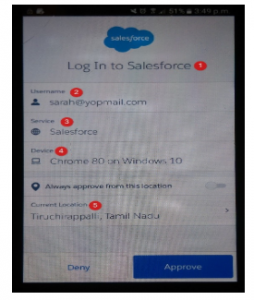
After verifying the activity details, she can perform one of the following two actions,
Action 1: If everything looks right, she just taps Approve on her phone.
Action 2: If she doesn’t recognize the activity, she taps Deny blocking it.
3.Account Activity Details
To view the list of account details, tap the Information Icon . The account detail page displays the following,
I.Verified Activities:It shows the number of times Salesforce Authenticator has verified the User’s login to Salesforce.
II.Automations: This displays the number of times Salesforce Authenticator logged the User in automatically from a trusted location.
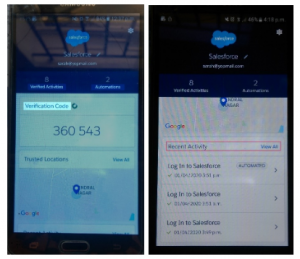
III. Click View All next to the Recent Activity to view the list of Activity History.
IV.Tap the Information ![]() Icon next to an activity to view the information of a User Action.
Icon next to an activity to view the information of a User Action.
4.Automate 2FA from a trusted location
Salesforce Authenticator lets us to Automate the 2FA process for the locations we trust.
4.1 Steps to Automate 2FA
The first time you use Salesforce Authenticator App, it asks for Access to your Location. Either allow access or later go to your mobile device’s settings to allow the App to access your location.
Browser: Log out of Sarah’s account and then log in as Sarah again.
Phone: At the prompt, the app displays details of your account activity. Select Always approve from this location.
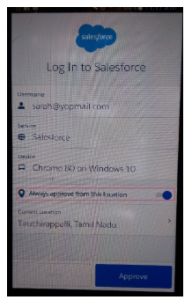
Browser: Log out of Sarah’s account and log in again. Voila! You are not prompted for an approval action.
Salesforce Authenticator recognizes the action and automatically verifies the activity. You need the mobile device with you, but don’t have to respond. Access granted automatically!!
4.2 Stop Location-Based Automated Verifications
If the user no longer trusts a location, they can turn off automated verification process.
I. In the connected accounts list, tap the username to view the account detail page. Under Recent activity section –> Click View All
II.Tap the Information Icon next to the location you want to stop trusting and click –> Review Trusted Location
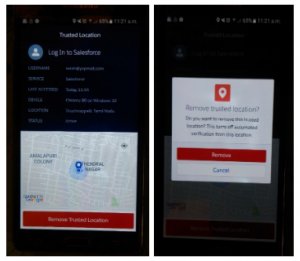
III. Tap Remove Trusted Location.
IV. The app asks you to confirm to turn off automated verifications from this location –> Click Remove.
5.Block unrecognized Account Activity
If you receive a notification from the Salesforce Authenticator App about an activity and if you do not recognize the details,
I. Tap Deny on your mobile device.
II.A pop-up appears, and the app lets you perform one of the following actions about the unrecognized activity.
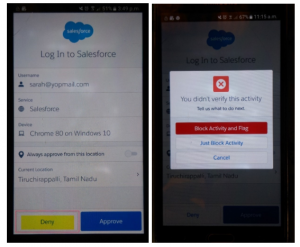
A. Block Activity and Flag:Tapping this will prevent unauthorized access to your account and alerts your Salesforce Admin of the potential security breach. This action will create a log entry in Salesforce’s Identity Verification History.
B. Block Activity:This prevents access to your account without flagging.
C. Cancel:if you tapped Deny by mistake, tap Cancel to go back and verify the activity.
6.Remove an Account from Salesforce Authenticator
6.1 Removal from Salesforce Authenticator App
When the user no longer wants to use the app for 2FA, remove the user account from the App.
I. Open the Salesforce Authenticator App. In the list of connected accounts, find the account you want to remove.
II. Just swipe left on the account username to remove an account.
III. Or, click the Information Icon ![]() and tap the right-side Icon
and tap the right-side Icon ![]() to remove an account. Tap –> Remove
to remove an account. Tap –> Remove
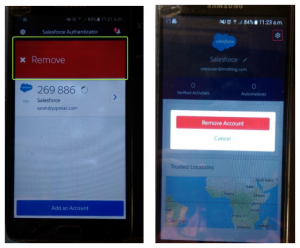
IV. A confirmation dialog appears. To confirm the removal of the account, tap Remove.
6.2 Removal from Salesforce Org
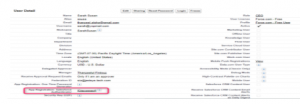
If you are disconnecting an account to switch to a new device or if your organization no longer uses Salesforce Authenticator as its 2FA, remove the Salesforce Authenticator connection for the user.
I.Log in as Admin –> Quick Find –> Users
II. Click the Username. On the user detail page, Click Disconnect next to App Registration: Salesforce Authenticator
7.Backup your connected accounts in the Salesforce Authenticator App
Salesforce Authenticator allows backup of your connected accounts. If you lose, damage, or replace your mobile device, you can restore your connected accounts on another mobile device.
Backup process can be accomplished by verifying your mobile number and by setting a four-digit passcode. Enable backup in the following ways,
I.Tap the Notification Icon ![]() in the upper right corner –> Tap Enable Backups.
in the upper right corner –> Tap Enable Backups.
II.Tap the Settings Icon ![]() in the upper left corner –> Tap Back up accounts.
in the upper left corner –> Tap Back up accounts.
III. When prompted, enter your mobile number and tap send. The App sends you a text message with a link.
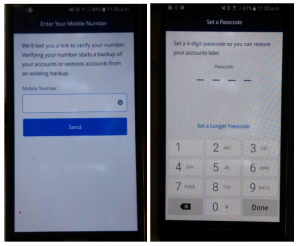
IV. Tap the link in the text message and authorize your mobile device to open the app.
V. Now, set your four-digit passcode. This passcode lets you restore your accounts on a new device.
7.1 To change or update your mobile number in the app,
Navigate to Settings –> Tap Verified Number.
Enter a new mobile number and repeat the verification process.
7.2 To change your passcode in the app,
Go to settings –> Tap Change backup passcode and enter a new passcode.
Points to remember
- An Internet connection is necessary to communicate with Salesforce for user verifications and location-based automated verifications.
- Verification Codes (time-based one-time passwords) can be generated without an Internet connection on the mobile device and can be used as an 2FA. The user just types in the code that Salesforce Authenticator displays.
- On the mobile device, if the user is not able to automate the authentication process,
I. Login to Salesforce as Admin –> Quick find –> Session Settings
II. SelectLet Salesforce Authenticator automatically verify identities using geolocation.
This change results in displaying the Current Location and lets the user perform Automation process in the Salesforce Authenticator App.
Advantages of Salesforce Authenticator App
- With Salesforce Authenticator, it is easy to access business critical apps through simple push notifications.
- Approve logins and other actions, verify automatically from trusted locations, through a single tap on the mobile device.
- Restore and backup either when the mobile is lost, or when the user wants to use a different mobile.
- Even if hackers steal the password, they cannot login. Because they do not have your mobile device with Salesforce Authenticator App installed on it.
- Reports / Dashboards can be authenticated using the Salesforce Authenticator App.
- When the data connection drops off, the authentication is still processed using the verification code.
- No limits to add the number of trusted locations in the app.
Considerations
- Connected accounts are active on only one device at a time. When you restore your connected accounts on a second device, you can no longer access them from the previous device.
- To restore the connected accounts on a new device, restore your accounts before creating new connected accounts on the new device. You cannot restore connected accounts from a backup after creating new connected accounts.
References
https://help.salesforce.com/articleView?id=salesforce_authenticator_overview.htm&type=5


